Upgrade Primary Server (pre-9.0.0.230)
This applies to upgrading from ENPS versions earlier than 9.0.0.230. See Upgrade from ENPS version 9.0.0.230 or later to upgrade from later versions.
Preparation
You should already have upgraded the Buddy Server. If not then do so now. See Upgrade Buddy Server (pre-9.0.0.230).
Before you start the upgrade process, make sure you do the following on the Primary Server.
Check for G_FIELD Issues
This should already have been checked on the Primary Server during the Buddy Server upgrade. See Check for G_FIELD Issues for information.
Check for Windows Updates
Check for Windows updates on the Buddy Server, installing and then rebooting the server at a convenient time.
Do not reboot both ENPS servers at the same time.
Update .NET Framework
Ensure that .NET Framework version 4.8 is installed:
-
on the server
-
on all machines that will run the ENPS client
Check the current installed version using the Platform Installer or the registry:
Platform installer
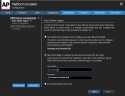
You do not need to close any ENPS processes, just run the Platform Installer. When you get to the following screen it will show you if a required element is missing:
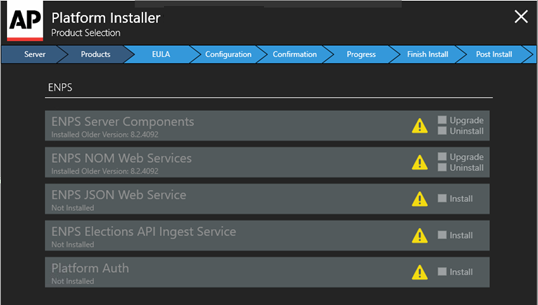
You can then add/fix whatever is missing, then exit out of the installer until you’re ready to install ENPS.
In the screenshot above, the Platform Installer displays the caution triangle indicating that .NET Framework 4.8 is required.
A link to download .NET Framework 4.8 is provided when the caution triangle is clicked.
.NET requires a reboot. Find a safe time to fail users to the Buddy and upgrade just.NET in preparation of your upgrade, or you can do this as the first step of your Primary upgrade. Make sure you are properly failing users to the Buddy prior to a reboot.
Registry
-
From the Start menu, choose Run, enter regedit, and then select OK.
-
In the Registry Editor, open the following subkey: HKEY_LOCAL_MACHINE\SOFTWARE\Microsoft\NET Framework Setup\NDP\v4\Full. If the Full subkey isn't present, then .NET Framework 4.5 or later is not installed.
-
Check for a REG_DWORD entry named Release. If it exists, then you have .NET Framework 4.5 or later installed. Its value corresponds to a particular version of .NET Framework.
-
For .NET Framework 4.8 that value must be 528040 or greater
.NET Framework version
Minimum value
.NET Framework 4.7.2
461808
.NET Framework 4.8
528040
.NET Framework 4.8.1
533320
In the example below .NET Framework 4.7.2 is installed, as the release number is 461814 (Higher than 461808 but lower than 528040).

Check for Unexpected Folders
Check the F:\Common folder for unexpected subfolders.
AUDIT, BUDDY, C_SUPPORT, DBSCRIPTS, ELECTION, G_SUPPORT, and G_SUPPORTBACKUP are expected. Any other folders are should be deleted or moved to the C:\ drive.
Create a Backups Folder
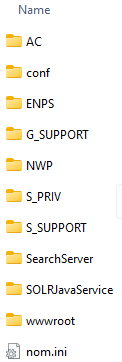
Create a backups folder on your desktop and then copy the following files and folders into the folder:
C:\inetpub\wwwroot
E:\Search Server\data\enps\conf (if applicable - legacy from v8.2.X)
E:\Search Server\SOLRJavaService (where applicable)
F:\Common\G_Support
F:\ENPS
F:\NOM\nom.ini
F:\NOM\AC
F:\NWP
F:\SearchServer
F:\ServerName\S_SUPPORT
F:\ServerName\S_PRIV
The backups folder should now look like this:
Check Data is in XML Format
Confirm that all of your data is in XML format, otherwise data will not appear in searches.
One way to confirm this is by checking whether the oldest archives on your servers are in XML format.
See Convert Data to XML Format for instructions on converting any non-XML files in your data. Content created with ENPS 7 and later is already in XML format, though older archives may not be.
Find AP Media API Key
In this version of ENPS you can ingest your AP Media API wires directly onto your server instead of to a separate box.
To set this up you’ll need to find your AP Media API key:
-
Log into AP Newsroom.
Instructions for logging in were sent in a Welcome Letter from the AP. Contact Us if you nor anyone at your site cannot find this letter and cannot find existing login credentials.
-
Select the option for the AP Media API key in the navigation menu to see the key.
You'll use this key later in the Set Up AP Media API section to set up your AP wires, after you’ve upgraded the server.
Set WebService Version
-
Open System Maintenance > Services
-
Remove any number before
.svcat the end of the Address URL for the Primary Server webservice.For example, change:
../nomwebservices3/nomwebservice82.svcto
../nomwebservices3/nomwebservice.svc. -
Set the ServiceVersion for the Primary Server webservice to 9.
These changes were also made when upgrading the Buddy Server. The table should now look something like:

-
Save changes.
Check Buddy Queue
Confirm there is no Buddy Queue built up on the Primary or server.
-
Open NOM Buddy Maintenance.
-
Ensure there are no persistent files in the top window.
-
Double-check this by opening that the F:\Common\Buddy folder on the Primary server and checking that it is empty.
If this folder is not empty, before proceeding Contact Us for help on emptying this folder to the Buddy server.
Switch Users to the Buddy Server
Remind users that they will see failover messages throughout the upgrade process. Users can continue working without interruption.
Switch users to the Buddy NOM by blocking the NOM on the Primary Server:
-
Open the NOM Buddy Maintenance tool on the Primary server.
-
Ensure there is no queue in the top window.
-
Open the News Object Manager (NOM) on the Primary server.
-
Open Window > NOM Configuration/Status and ensure the Block Primary Access box is ticked.
-
Confirm that users can work on the Buddy Server
Close all ENPS components on the Primary Server, starting with NOM Watcher.
Prepare Search
Purge the index in preparation for a recrawl:
-
Open a Command Prompt.
-
Enter the following:
This command is case-sensitive, and there is a space after .exe before the /
Additionally, change the status of the ENPSDataService, SOLRJavaServer and Windows Search services:
-
Open Windows Services (services.msc).
-
Right-click the ENPSDataService service from the list.
-
Select Stop from the popup menu.
-
Right-click the SOLRJavaServer service from the list.
-
Select Stop from the popup menu.
-
Right-click the Windows Search service in the list.
-
Select Properties to open a dialog box.
-
Click Stop.
-
Set General tab > Startup type to Disabled.
Remove Watch.exe
Remove the Watch.exe shortcut from the startup folders:
-
Click Start, type
Runand enter the following in the Run dialog to open the first startup folder: -
Remove the Watch.exe shortcut from the folder if it exists.
-
Click Start, type
Runand enter the following in the Run dialog to open the second startup folder: -
Remove the Watch.exe shortcut from the folder if it exists.
Uninstall Java SDK and RTE
Uninstall any versions of Java SDK and RTE in preparation for installing/updating Amazon Corretto:
-
Open
 Start Menu > Apps & Features.
 -
Search the apps list for Java SDK.
Delete any installations found.
-
Search the apps list for Java RTE.
Delete any installations found.
Update Corretto for Solr
ENPS requires Amazon Corretto OpenJDK. Ensure you only have Coretto version 11 installed.
First, uninstall any versions of Corretto other than version 11:
-
Open
Start Menu > Apps & Features. -
Search the apps list for Corretto.
-
Click on each Corretto entry to check the version.
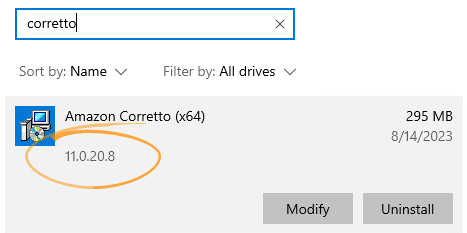
-
Uninstall all Corretto installations that are not version 11.
If you can't uninstall Corretto because it is still in use:
-
Open Task Manager.
-
Open the Services tab.
-
Right-click SolrJavaService in the list and select Stop from the popup menu.
-
Try deleting Corretto again.
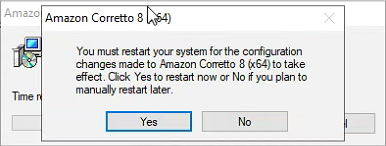
If prompted to restart your system:
-
Remove the Watch.exe shortcut from the startup folders:
-
Click Start, type
Runand enter the following in the Run dialog to open the first startup folder: -
Remove the Watch.exe shortcut from the folder if it exists.
-
Click Start, type
Runand enter the following in the Run dialog to open the second startup folder: -
Remove the Watch.exe shortcut from the folder if it exists.
-
-
Click Yes to restart.
-
Once all other versions of Corretto have been uninstalled, install Corretto 11 if it is not already installed:
-
Browse to https://aws.amazon.com/corretto.
-
Download a Windows x64, .msi Corretto installer for Corretto version 11.
-
Run the Corretto installer.
-
Click Next, Next and Install to perform a default installation.
Finally, ensure that SolrJavaService is running:
-
Open Task Manager.
-
Open the Services tab.
-
Ensure that SolrJavaService in the list has a Running status.
If not, right-click SolrJavaService and select Start from the popup menu.
If the required version of Corretto is not installed, the Platform Installer will also alert you and provide a link to the download site.

For details about using Solr in ENPS, see Solr Search.
Enable Dynamic Compression
The Dynamic Compression feature allows the Internet Information Services (IIS) Webservice to compress data that is being sent to ENPS clients.
Turning on this feature brings a considerable increase in ENPS client performance, particularly for users on a weak connection to ENPS servers. For example, improvements should be noticed with client start time, search time, and general speed when working with rundowns.
To check that dynamic compression is enabled for ENPS desktop clients:
-
Open Server Manager.
-
Click Add roles and features.
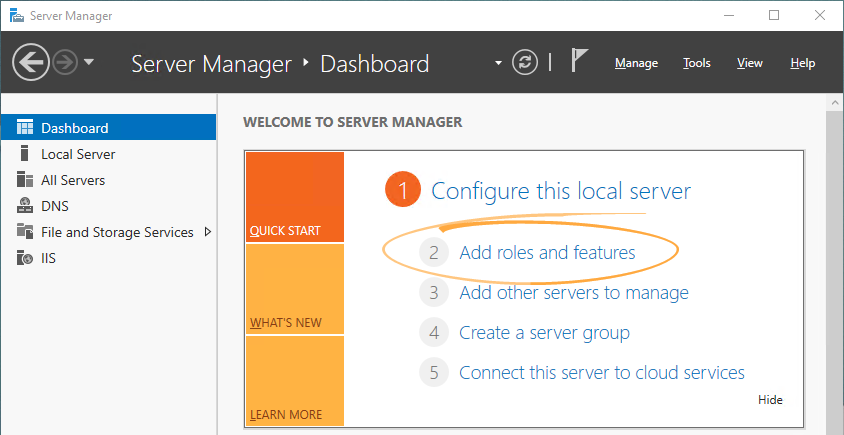
-
Click Next in the Add Roles and Features Wizard until you reach the Server Roles page, ensuring your server has been selected:
-
Ensure that Web Server (IIS) > Web Server > Performance > Dynamic Content Compression is ticked:
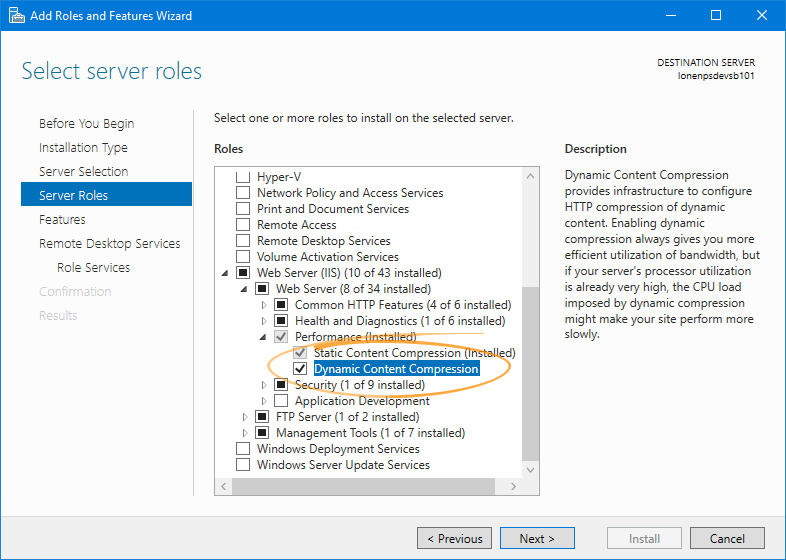
-
Click Next twice and then click Install.
-
Click Finish when installation has completed.
Installation
Once all Preparation is complete, continue with installation:
-
Right-click on the ENPS Platform Installer .zip file downloaded in Download Installer and select Properties.
-
Ensure that the General tab > Unblock box is ticked if it exists, then click OK.
-
Extract the ENPS installer from the ENPS Platform Installer .zip file.
-
Run the extracted ENPS Platform Installer.
-
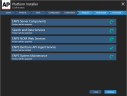
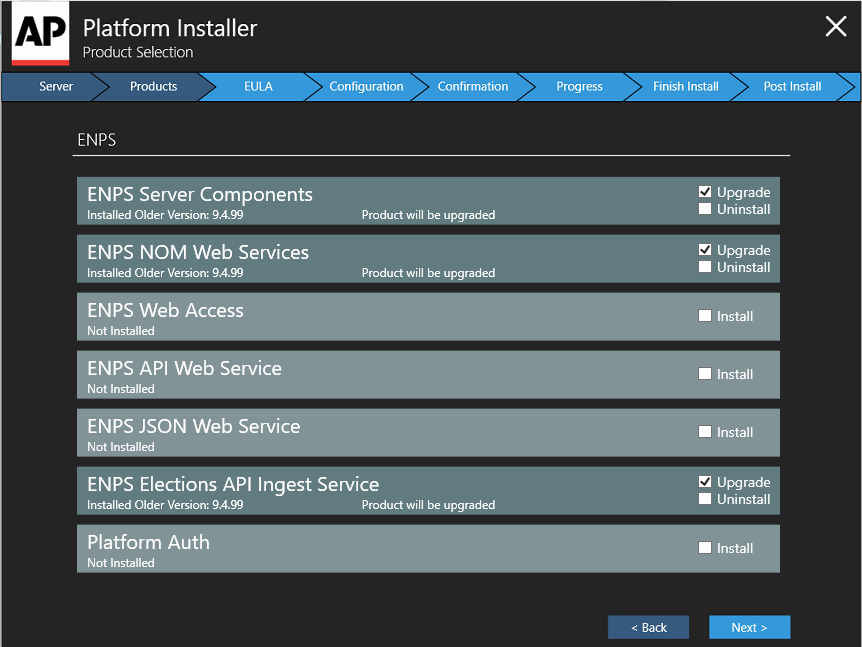
On the Product Selection screen select the following for a typical ENPS installation:
-
ENPS Server Components - Upgrade
-
ENPS NOM Web Services - Upgrade
-
ENPS Elections API Ingest Service - Upgrade or Install
Your screen should look like this:
The installer will flag if the server does not have the correct version of Corretto installed.

If you see this message, exit the Platform Installer and complete the steps in Update Corretto for Solr above. Then restart the Platform Installer.
-
-
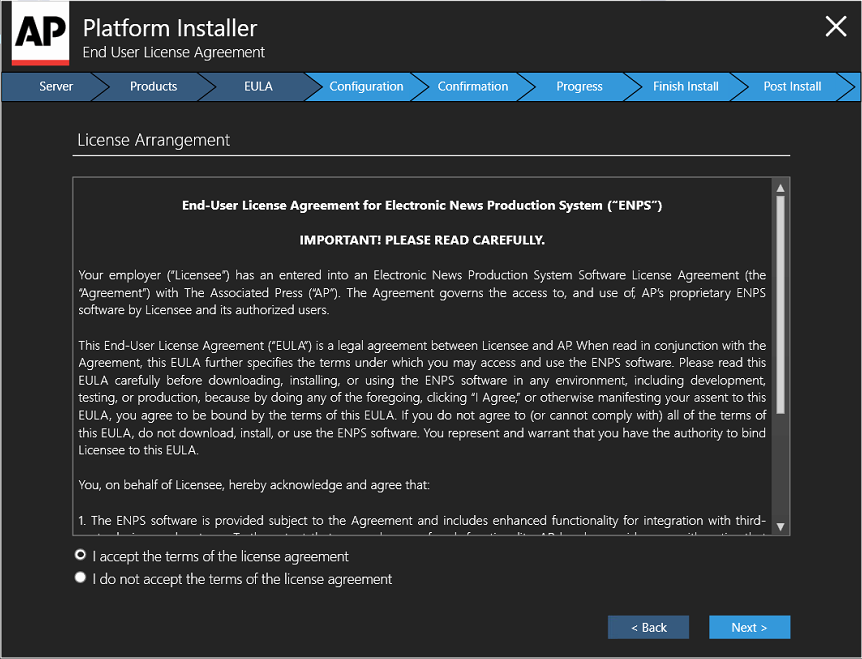
On the End User License Agreement screen, read the agreement and accept the terms.
-
Click Next.
-
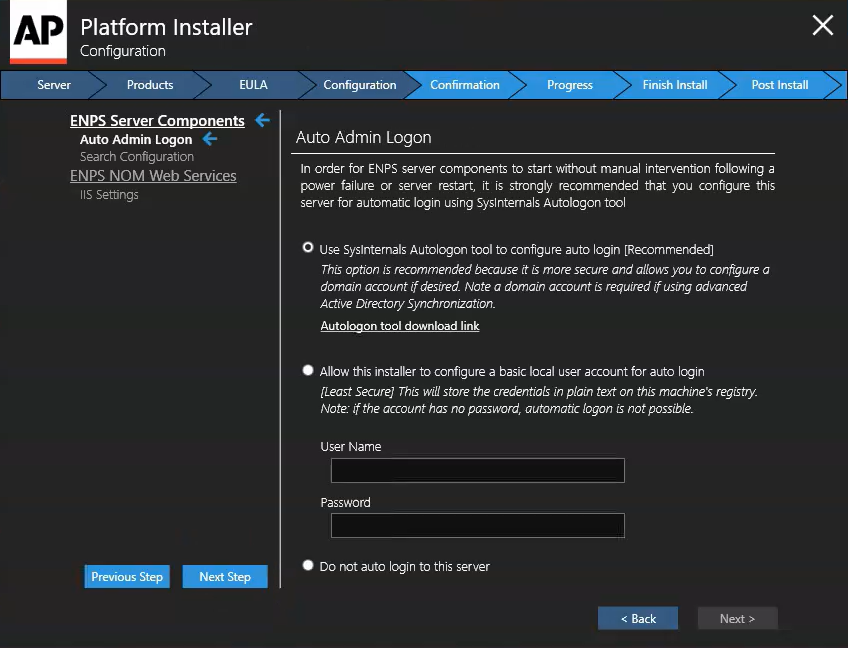
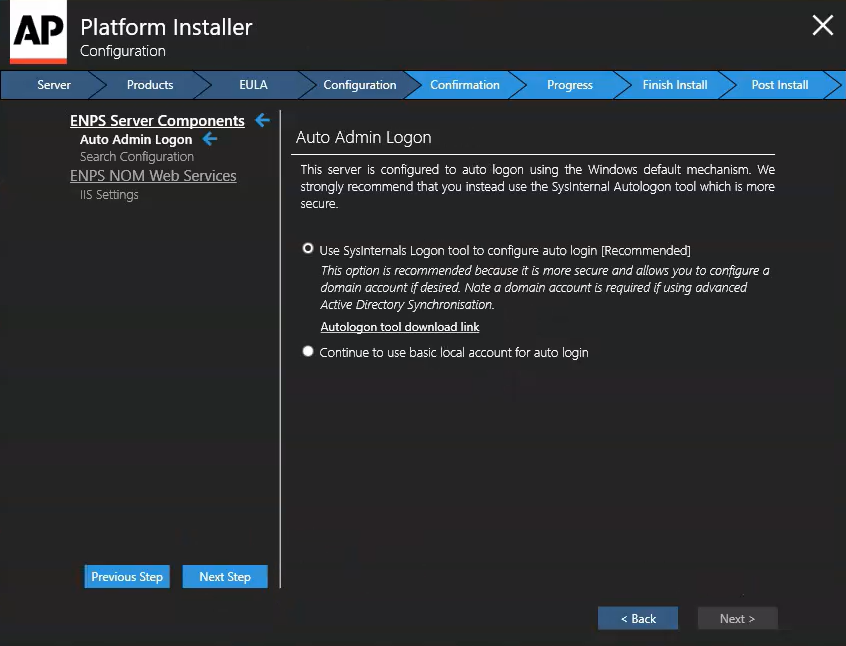
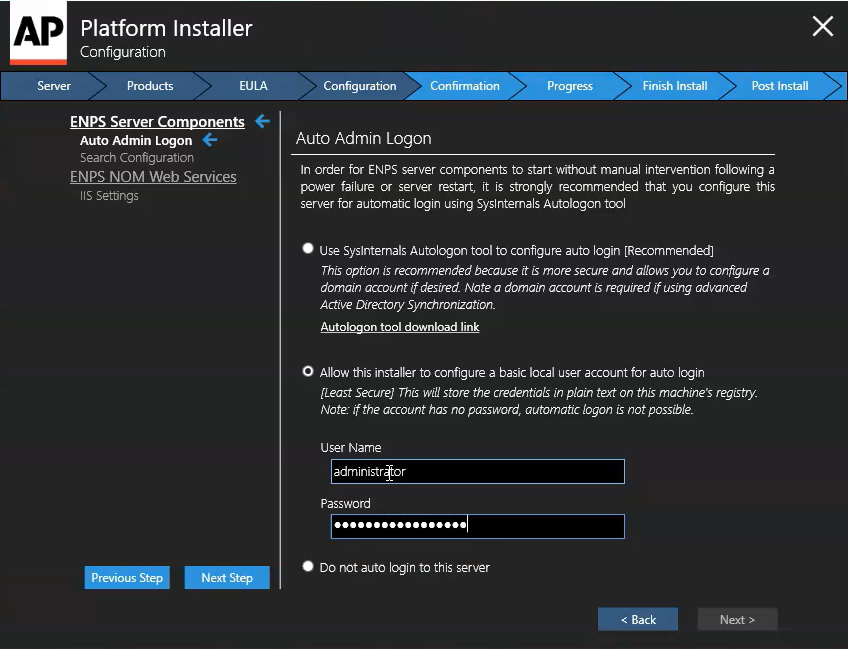
Configure admin login using either:
-
SysInternals Autologon tool (recommended, encrypted):

or

Click the Autologon tool download link in the installer to get the tool, or browse to https://learn.microsoft.com/en-us/sysinternals/downloads/autologon.
-
Basic local user account (least secure, unencrypted):
or
Alternatively, do not use auto login on this server.
This option is not available if the server is already configured to use an admin login method.

-
-
Click Next.
-
On the Configuration > Search Configuration screen, enter a username and password for Solr and ensure that Override and configure SOLR specific settings is ticked.
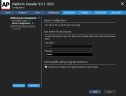
Do not leave User Name and Password blank as it may cause later connection issues with Solr.
-
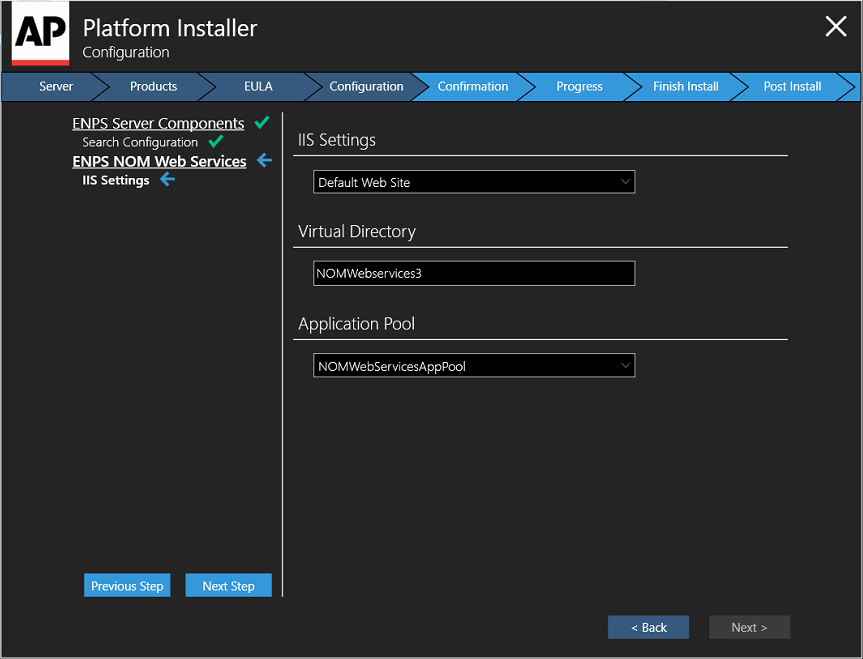
On the Configuration > IIS Settings screen, Webservice should be preselected with the correct Application Pool (NOMWebServicesAppPool).

-
Click Next to start installation.
Click Run in any prompts that appear.
-
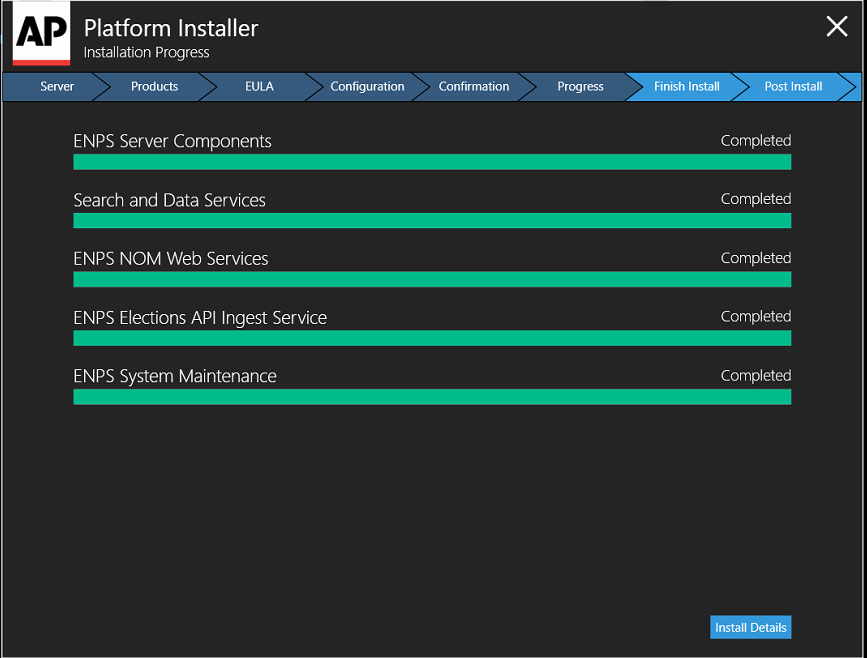
Wait for installation to complete successfully.
-
Click Install Details.
-
Click Finish.
-
Recrawl existing data.
Recrawling is required due to the removal of the ENPS Data Service and Solr being updated to a new version.
Recrawling should be deferred until after upgrading:
-
Ensure that Re-crawling of data required is not ticked.
-
Click Close.
-
Perform the manual recrawl when instructed in the After Server Restart section below.
-
-
Click OK to close the installer.
Do not start NOM Watcher.


Proceed to the Post-installation instructions.
Post-installation
Before Server Restart
After Installation is complete and before restarting the server:
-
Open the backups folders created during Primary Server Preparation.
-
Open the ENPS\v7\ENPSClient.exe.config file.
-
Compare this file with the same file in F:\ENPS\v7 on the Primary Server, specifically:
-
Check that the Primary and Secondary webservice settings are correct.
-
Continue with these steps:
-
If this server ingests FTP wires, confirm if the FTP wire log files (.DC) are in the NWP folder.
If not, restore them from the backup of the NWP folder created during Preparation.
-
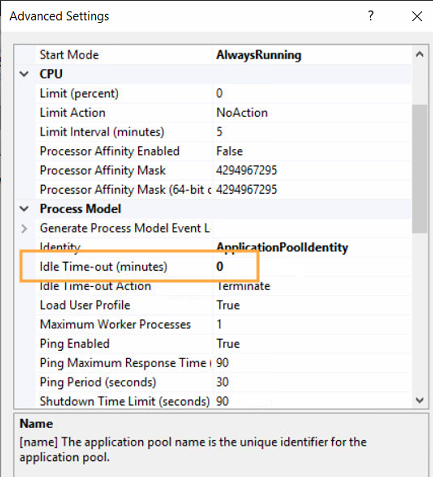
Edit the NomWebServiceAppPool application pool:
-
Open Internet Information Services (IIS) Manager.
-
In the Connections pane, expand the server name and select Application Pools.
-
In the Application Pools pane on the right, right-click NomWebServiceAppPool and select Advanced Settings.
-
Set the Idle Time-out (minutes) option to 0 in the Advanced Settings popup.

-
Click OK.
-
Right-click NomWebServiceAppPool again and ensure that it is started.
-
-
Delete the contents of the F:\NOM\MOS\OUT folder if it exists.
-
Remove the Watch.exe shortcut from the startup folders:
-
Click Start, type
Runand enter the following in the Run dialog to open the first startup folder: -
Remove the Watch.exe shortcut from the folder if it exists.
-
Click Start, type
Runand enter the following in the Run dialog to open the second startup folder: -
Remove the Watch.exe shortcut from the folder if it exists.
-
Now restart the server.
After Server Restart
After restarting the server:
-
Launch the News Object Manager (NOM) in block mode on the primary server by entering this into a command line:
There is a space after .exe and before /block.
If your ENPS data drive is something other than F:\, use that drive letter instead.
-
Open Window > NOM Configuration/Status and ensure the Block Primary Access box is ticked.
-
Launch Watch.exe on the Buddy server.
-
Open the NOM Buddy Process window on the Buddy server and make sure it is emptying out to the Primary Server.
If not, try regenerating the schema on the Buddy Server by entering the following in a command prompt:
-
Click Start, type
Runand enter the following in the Run dialog to open the user startup folder:shell:startup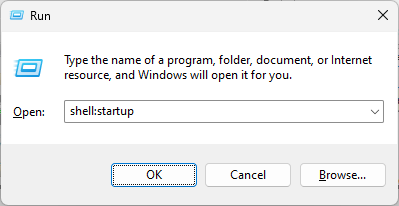
This should be for the account that is set to auto-logon to start ENPS server.
-
Copy the Watch shortcut from the desktop to the startup folder.
-
Confirm that all wires are ingesting as expected.
If any FTP wires are not ingesting, deactivate the wire, re-enter the password for the FTP server, and activate the wire again.
-
Ensure there is not a queue in the Buddy Maintenance Process window on the Buddy Server.
Set Up AP Media API
Set up your AP Media API wire natively on your server:
-
Open News Wire Profiler.
-
Select File > New Wire and select APMEDIAAPIFEEDS from the popup and click OK.
A new wire window appears.
-
Click More to expand the window to show settings for the new wire.
-
Configure the wire as follows:
Use the API key found in the earlier Find AP Media API Key section.
Field Description Get Member Content
Not used.
Server URL
Set to https://api.ap.org
API Key
API credentials provided by AP, for example on AP Newsroom.
Provider
Set to AP or other custom setting as needed.
Although multiple products can be added to each Media API wire, each wire may only have one Provider code. To use multiple Provider codes, create a separate Media API wire for each code.
Cat Map
Set to NAA or other custom setting as needed.
Story Format Select MediaAPI_v3.0_Story and MediaAPI_v3.0_Storybody respectively in the two dropdown menus.
-
Click Click to Refresh to update the Available Products list.
To add an available product to the Products to Display list, click on the product and then click ADD ->.
-
Tick the Active checkbox to activate the wire.
-
If you've previously been ingesting your AP Media API wires on a separate box then that box can now be powered down.
See Wires via AP Media API for more information on this wire.
Set Up Search
-
Open, f, search server, SearchCrawler.exe.config
SolrURI path should be <add key="solrUri" value="http://<CURRENTSERVERNAME>:8080/solr/enps" />
It’s very important that you enter your current server’s name, or change it to local host. Either is fine. If in the example above it was local host it would look like this.
<add key="solrUri" value="http://localhost:8080/solr/enps" />
Open, f, search server, SOLRSchemaManager.exe.config, confirm this string.
<add key="solrUrl" value="http://localhost:8080/solr/enps" />
So in this file, the installer should have put this string in there automatically.
-
Regenerate the SOLR Schema. There are spaces after .exe and after regenerate
Run the following from command prompt
(f:\SearchServer\SOLRSchemaManager.exe /regenerate /reset:true)
-
Copy and paste the searchcrawler.exe.config , to the desktop of the server. You want to do this so that once we are done with the next few steps you can put it back easily.
-
Open SearchCrawler.exe.config , from the search server folder on the root of F
Look at the database section. You’ll see entries for NWS, primary server name and buddy server name. See the picture below.
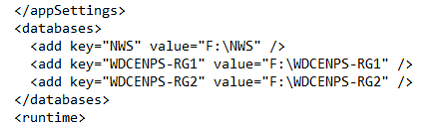
To speed up the process for the crawls, you’re going to edit those sections so that it looks like this:
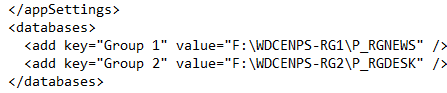
So no more NWS , primary server name folder and buddy server name folder. Instead you’re telling it to just check the files, in these specific folders. Just look in the primary server name folder, for what group’s the station has.
I find it easiest to copy one of the existing strings, and then add to it. So for example:
<add key=”PRIMARYSERVER” value=F:\PRIMARYSERVERNAME” />
Becomes:
<add key=”Group1” value=F:\PRIMARYSERVERNAME\P_group” />
You will add a line, for every p_group the site has, that needs to be indexed. This is going to be mainly your news and desk groups. You do not need to crawl your mos folders.
-
Save the file.
-
Run the SearchCrawler utility to repair any duplicate GUIDs and remove duplicate stories from WIP data.
(f:\SearchServer\Searchcrawler.exe /repairguids /removeduplicatestories)
As it is scanning the data you will see the following repeated line
Solr: 0 files.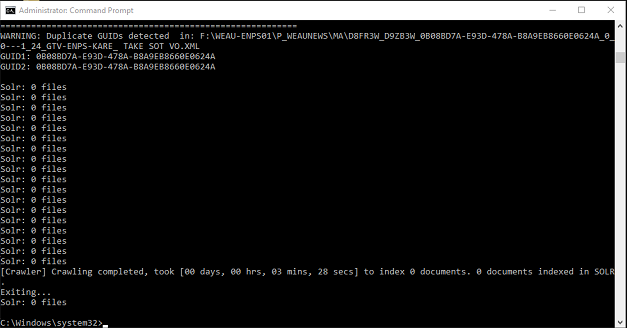
-
When the crawl is done, replace the changed SearchCrawler.exe.config with the backup you put on the desktop.
-
Run the SearchCrawler utility to recrawl the data(f:\SearchServer\Searchcrawler.exe). At this stage the server can be used by users. However, note that not all data can be searched for until the crawl is complete. You will have one final step to do for search, once the crawl is done.
At this point it’s a choice, to come back to the primary and continue with the installation while the crawl runs, or let the crawl finish completely before continuing.
When that crawl is done, scan the entire index to check if the H drive has any duplicate stories. To do so:
-
Open a Command Prompt.
-
Enter the following:
f:\SearchServer\Searchcrawler.exe /repairguids /removeduplicatestories
There is a space between .exe and /repairguids and another space after before /removeuplicatestories
As it is scanning the data you will see the following repeated line
Solr: 0 files.
-
Wait for the command to complete.
-
Open the F and H drives and check if there are duplicates folders:
F:\P_<GroupName>_Duplicates
H:\P_<GroupName>_Duplicates
If there are no such folders then skip these steps.
-
Move any duplicates folders to another location, such as the Desktop.
-
Run the crawl again:
f:\SearchServer\Searchcrawler.exe /resume:false
-
Unblock the Primary Server
-
If your users do not have local admin rights on their workstations, you may enter credentials they can use for the upgrade in the application, F:\NOM\Setadmin.exe. These credentials should have local admin rights on all workstations.
This will ensure that the ENPS Client can be upgraded on these workstations.
-
Unblock the Primary Server once the Buddy queue is empty.
-
Try launching a client to check if it upgrades.
If so, have one regular user close and relaunch ENPS.
If the upgrade fails, try a different account in setadmin.exe. It’s fine if it’s an account with an expiring password. You only need setadmin credentials to be current on a day you’re upgrading ENPS.
-
Launch a client on a machine without local admin rights to confirm that the client upgrades.
-
Upgrade all control room and set machines at this time (recommended).
Cloud Licensing
To continue receiving license key updates that allow your ENPS system to operate, you must transition to Cloud Licensing.
To complete this process, your ENPS servers must have internet access.
Please Contact Us at one of the numbers below to complete this process.
1-866-367-7911 (US & Americas)
+1-202-641-9641 (International)
+44.20.7482.7707 (EMEA, APAC & ROW)
If your ENPS servers do not have internet access, please contact us to discuss an alternative solution.
Next Steps
You have now upgraded the Primary Server!
Proceed to Upgrade Mobile Server if applicable.