Planning Grids
Planning Grids are used to identify and organize the Stories that will become the basis for your organization's output.
Users can also create Personal Planning Grids that are saved in their Personal Folder.
Open a Planning Grid
By default, the Planning Grid for your home folder sits at the top of the Calendar. If your home group has more than one grid, to open a Planning Grid, go to your Home Folder or another folder in your enterprise and locate the ![]() planning Grid.
planning Grid.
To open a Personal Planning Grid, open your Personal Folder and located the ![]() Planning Grid. If your site creates multiple Planning Grids as part of their daily workflow, those ad-hoc Planning Grids will be deselected when the user first opens the Planning Calendar, unless the user specifically adds them to their view.
Planning Grid. If your site creates multiple Planning Grids as part of their daily workflow, those ad-hoc Planning Grids will be deselected when the user first opens the Planning Calendar, unless the user specifically adds them to their view.

Double-click the entry or drag it into a window to open it.

Create a Planning Grid
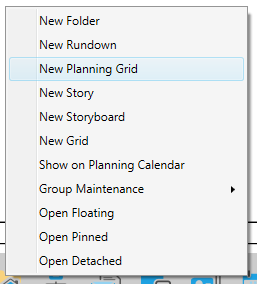
To create a new Planning Grid, right-click on the folder where you want to create it, such as the ![]() Home Folder icon on the NavBar, or the
Home Folder icon on the NavBar, or the ![]() Personal Folder icon for a Personal Grid, and select New Planning Grid.
Personal Folder icon for a Personal Grid, and select New Planning Grid.

You can also create a Planning Grid in your Personal Folder by selecting ![]() File Menu > New > Planning Grid.
File Menu > New > Planning Grid.

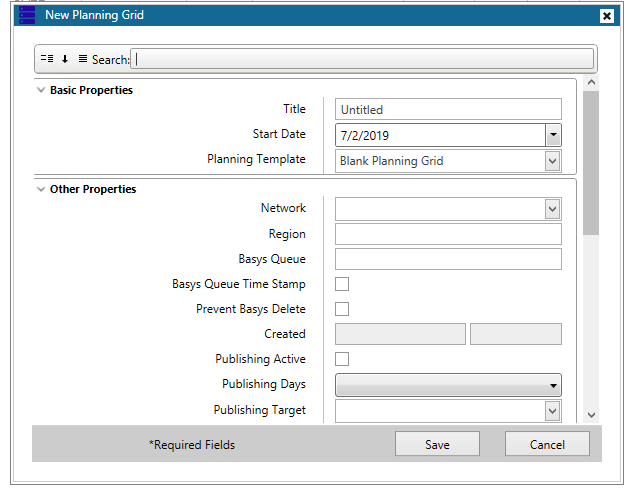
See Planning Grid Properties for a description of each property.
Sort and Filter Planning Grid Properties
The bar at the top of the screen allows you to sort and filter contact properties.

The three icons on the left change how you sort the list of properties.
|
|
Sort the fields in two categories: basic and other. You can collapse and expand these categories by clicking on the arrow icons. |
|
|
Sort the properties in alphabetical order. |
|
|
Turn off sorting. Fields will appear in the default order. |
The Search box lets you filter properties that contain a specific piece of text. For example, you can type MOS to view all the options that contain MOS in the property name. Delete the text in this box to return to the full list of properties.
Create a Break Line
Break lines can be used to help organize Planning Grids.
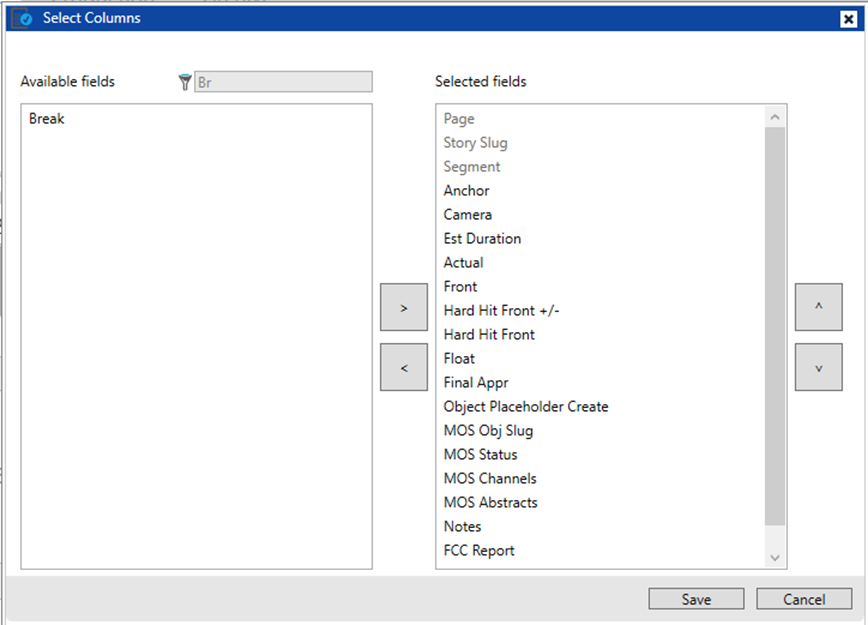
To create a break line in a Planning Grid, click on the Select Columns button on the Layout tab of the Planning Grid Ribbon.
In the Select Columns window find Break in the Available fields panel on the left. Move it to the Selected fields panel on the right by using the right arrow button located between the panels. Then click Save.

With the column now added, click in the check box for each row you would like to turn into a break row. A break row is identified by its blue color.

Once all breaks are created, remove the Break column from the Planning Grid by either left clicking on the Break column’s title box and dragging to the trash, or by clicking on the Select Columns button on the Layout tab of the Planning Grid Ribbon. In the Select Columns window find Break in the Selected fields columns panel on the right. Move it to the Available fields panel on the left by using the left arrow button located between the panels. Then click Save.
Black Line Area
The black bar across the bottom of a Planning Grid is used to separate content that will be included as part of the day’s planning, broadcast or digital output. Planning Items below the black line are not included in MOS functionality. This area of the black line is useful if the assignment manager is not sure the planning item will be covered that day.
Planning Items below the black line can be moved above the black line at any time.
Planning Items below the black line do not archive when Auto Archive is selected in the planning grid properties. Users can save the Planning Items below the black line by manually archiving the Planning Grid.
Add External Files
You can drag external documents into either a Planning Grid collection field, such as the Background field.
By default, only documents up to 500,000 bytes can be dragged into a collection field, but your System Administrator can raise this value up to 3,000,000 bytes.
Your site's System Administrator must enable this option before you can use it.
The file will open in the associated application that has been configured for that extension. For example, a DOCX will typically open in Microsoft Word; a JPEG file will open in whichever image viewer Windows is configured to open it. If no program is registered on the workstation for a specific file extension, the ENPS Client will attempt to open the file in the ENPS ENPS Web Browser. If a file is opened in the ENPS Web Browser you will be prompted to save any changes, regardless of whether or not any changes have actually been made.
Almost any type of file may be dragged into these locations except executable files, such as programs with an EXE extension. Your site's System Administrator may also prevent other file types from being added.
Search in the ENPS Client will only return external files that have been linked to content contained in folders included in the search parameters.