Planning Calendar
The Planning Calendar provides a simple interface for day-of and long-term editorial planning and scheduling. The Planning Calendar does not replace Planning Grids but provides a different view of the same data.
Open the Planning Calendar
Each folder in the ENPS Client has a default Planning Calendar. To open the Planning Calendar, click on the calendar icon in the Navigation Bar:
![]()
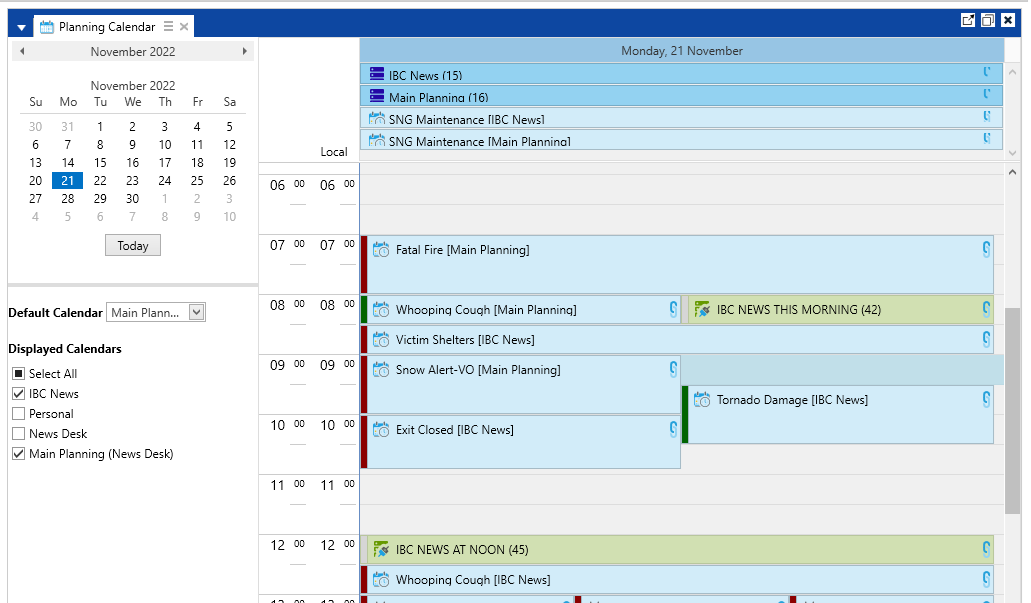
Content can be added to any date on the calendar without having to first create a Planning Grid. The first time an event is added to a date on the calendar, a "Default" Planning Grid for that day is created automatically and a link to the Planning Grid is displayed at the top of the calendar.
Note that these “Default” grids do not show up in the folder.
If you create additional Planning Grids in a folder, they and their constituent Planning Items will also be displayed on the Calendar.
If you prefer to work with Planning Grids that are auto-created in advance and visible in the folder list, see Change the Default Planning Grid.

Any Rundowns scheduled for output on a given day are automatically displayed on the Calendar for scheduling purposes and ease of access. You can also toggle whether you want to view Rundowns in the Planning Calendar by clicking the Rundowns and Planning Items toggle buttons on the Planning Calendar Ribbon.
![]()
![]()
Select which Planning Grid items to view by using the checkboxes under the Displayed Calendars heading in the pane on the left. You can add Planning Grids from additional groups in your enterprise by using the Locations button on the ribbon.
![]()
You can display planning content from more than one folder at a time on the same calendar, either overlaid in a single view or side-by-side using buttons on the Layout tab. The date tab allows you to group more than one day by date in whichever mode you have chosen.
![]()
![]()
![]()
Use the Planning Calendar
The Planning Calendar is designed to work like other calendar programs with which you may be familiar.
Create Item
To add an event, click on the start time for the event and give it a title.
The default time for a new event is 30 minutes; however you can change the length of the event time slot by dragging the bottom of the Planning Item up or down. Entries that you place at the top of the calendar, above the time slots, have no specific start time. You can move the start time of an event by dragging the top of the Planning Item to a new time slot.
To create a new Planning Item in the same time slot as an existing Planning Item, first click to the right of the existing planning item. Start typing to give the event a title or right-click and select New Planning Item.
Create Item with Microsoft Outlook
You can create an event in the Planning Calendar by dragging and dropping an email or a calendar item from Microsoft Outlook into the Planning Calendar. Once the item is dropped into either the group or personal calendar, ENPS will create the Planning Item.
An event in the Planning Grid will also be created, and any attachments in the email will be added to a Collection field like Background or Assign Info.
The name of the sender of an email dropped into the Planning Calendar will be retained in the text of the calendar entry.
Copy Item
If you want to make a copy of a Planning Item, select the item then hold down Ctrl and drag it to where you want the copy to appear.
Copy Item into Rundown or Planning Grid
There are two ways to copy a Planning Item into a Rundown or Planning Grid:
-
Open the Rundown or Planning Grid in a window separate from the Planning Calendar. Drag the Planning Item to where you want it to appear in the target Rundown or Planning Grid.
-
Drag Planning Items into Rundowns or Planning Grid entries within the Planning Calendar by holding the
Shiftbutton and dragging the item to the entry for the Rundown or Planning Grid. Planning Grids for the selected date are alwaysvisible in the Planning Calendar, but Rundowns will only appear if the Rundown button is selected on the Planning Calendar Ribbon.
Once you add an entry to a Planning Grid it will appear in the last row. In Rundowns, the new row will be placed below the Rundown's black line where the show's producer can move it into the correct position.

Approve Item
Users with sufficient privileges can approve Planning Items by right-clicking on the item and selecting Approve. You can remove the approval by right-clicking on the item and selecting Unapprove.
Delete Item
You can delete an item from the Planning Calendar by right-clicking on the item and selecting Delete.
Change the Default Planning Grid
When an event is added to the face of the calendar, it goes into a special type of Planning Grid that is not displayed in any folder.
However, you can specify an alternative Planning Grid be used as the default for new Events. To do so:
-
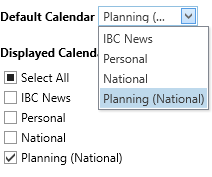
Make sure the Planning Grid you wish to specify is listed under Displayed Calendars.
-
Select the Default Calendar box and choose the Planning Grid you would like to use.

Once you have chosen an alternative Default Calendar, any new event you add to the face of the calendar will be stored in the chosen grid, as long as a grid with that name pre-exists on the given date.
If an event is created on a date for which no grid matching the Default Calendar exists - perhaps because it is too far into the future - then the calendar will fall back to storing the event in an auto-generated “hidden” grid.