Upgrade Buddy Server
This applies to upgrading from ENPS 9.0.0.230 or later. See Upgrade from ENPS versions earlier than 9.0.0.230 to upgrade from earlier versions.
Preparation
Before you start the upgrade process, make sure you do the following on the Buddy Server:
-
Check for Windows updates on the Buddy Server, installing and then rebooting the server at a convenient time.
Do not reboot both ENPS servers at the same time.
-
Check the F:\Common folder for unexpected subfolders.
AUDIT, BUDDY, C_SUPPORT, DBSCRIPTS, ELECTION, G_SUPPORT, and G_SUPPORTBACKUP are expected. Any other folders are should be deleted or moved to the C:\ drive.
-
Create a backups folder on your desktop
-
Copy the following files and folders to the backups folder:
C:\inetpub\wwwroot
E:\Search Server\data\enps\conf (if applicable - legacy from v8.2.X)
E:\Search Server\SOLRJavaService (where applicable)
F:\Common\G_Support
F:\ENPS
F:\NOM\nom.ini
F:\NOM\AC
F:\NWP
F:\SearchServer
F:\ServerName\S_SUPPORT
F:\ServerName\S_PRIV
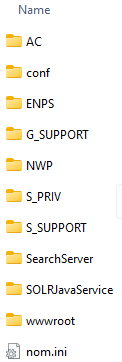
The backups folder should now look like this:
-
Close all ENPS components on the Buddy Server, starting with NOM Watcher.
-
Purge the index in preparation for a recrawl:
-
Open a command prompt.
-
Enter the following:
This command is case-sensitive.
Note there is a space after .exe before the /
-
Update Corretto for Solr
ENPS requires Amazon Corretto OpenJDK. Ensure you only have Coretto version 11 installed.
First, uninstall any versions of Corretto other than version 11:
-
Open
 Start Menu > Apps & Features.
 -
Search the apps list for Corretto.
-
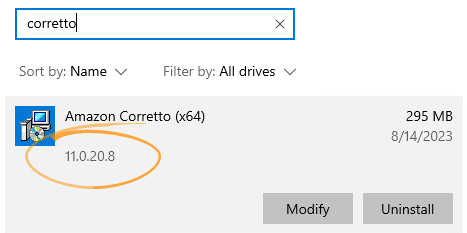
Click on each Corretto entry to check the version.
-
Uninstall all Corretto installations that are not version 11.
If you can't uninstall Corretto because it is still in use:
-
Open Task Manager.
-
Open the Services tab.
-
Right-click SolrJavaService in the list and select Stop from the popup menu.
-
Try deleting Corretto again.
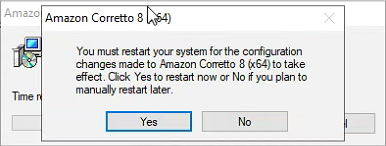
If prompted to restart your system:
-
Remove the Watch.exe shortcut from the startup folders:
-
Click Start, type
Runand enter the following in the Run dialog to open the first startup folder: -
Remove the Watch.exe shortcut from the folder if it exists.
-
Click Start, type
Runand enter the following in the Run dialog to open the second startup folder: -
Remove the Watch.exe shortcut from the folder if it exists.
-
-
Click Yes to restart.
-
Once all other versions of Corretto have been uninstalled, install Corretto 11 if it is not already installed:
-
Browse to https://aws.amazon.com/corretto.
-
Download a Windows x64, .msi Corretto installer for Corretto version 11.
-
Run the Corretto installer.
-
Click Next, Next and Install to perform a default installation.
Finally, ensure that SolrJavaService is running:
-
Open Task Manager.
-
Open the Services tab.
-
Ensure that SolrJavaService in the list has a Running status.
If not, right-click SolrJavaService and select Start from the popup menu.
If the required version of Corretto is not installed, the Platform Installer will also alert you and provide a link to the download site.
For details about using Solr in ENPS, see Solr Search.
Enable Dynamic Compression
The Dynamic Compression feature allows the Internet Information Services (IIS) Webservice to compress data that is being sent to ENPS clients.
Turning on this feature brings a considerable increase in ENPS client performance, particularly for users on a weak connection to ENPS servers. For example, improvements should be noticed with client start time, search time, and general speed when working with rundowns.
To check that dynamic compression is enabled for ENPS desktop clients:
-
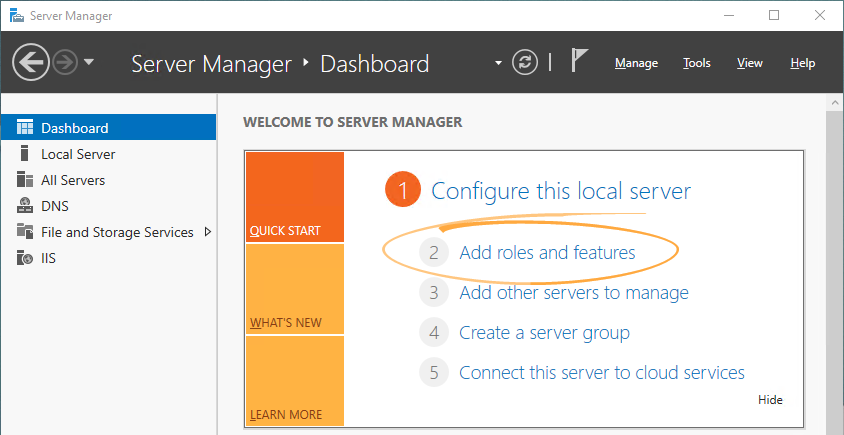
Open Server Manager.
-
Click Add roles and features.
-
Click Next in the Add Roles and Features Wizard until you reach the Server Roles page, ensuring your server has been selected:
-
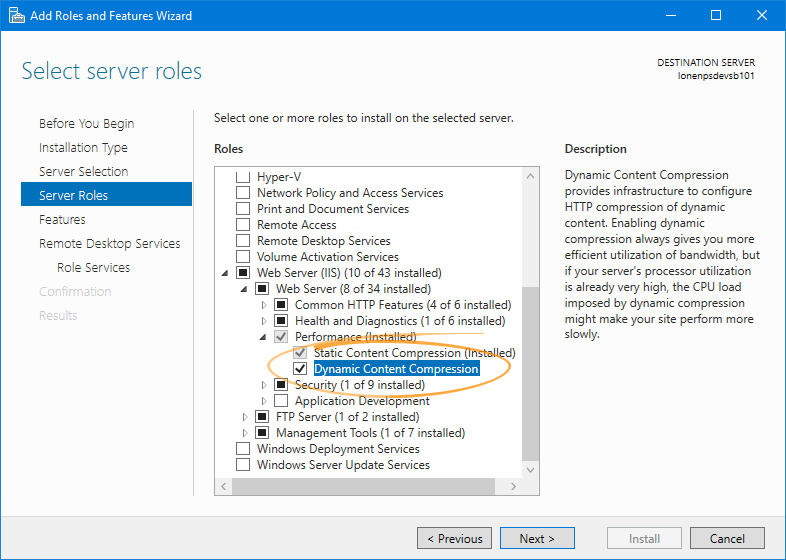
Ensure that Web Server (IIS) > Web Server > Performance > Dynamic Content Compression is ticked:
-
Click Next twice and then click Install.
-
Click Finish when installation has completed.
Installation
Once all Preparation is complete, continue with installation:
-
Right-click on the ENPS Platform Installer .zip file downloaded in Download Installer and select Properties.
-
Ensure that the General tab > Unblock box is ticked if it exists, then click OK.
-
Extract the ENPS installer from the ENPS Platform Installer .zip file.
-
Run the extracted ENPS Platform Installer.
-
On the Product Selection screen select the following for a typical ENPS installation:
-
ENPS Server Components - Upgrade
-
ENPS NOM Web Services - Upgrade
-
ENPS Elections API Ingest Service - Upgrade or Install
Your screen should look like this:
The installer will flag if the server does not have the correct version of Corretto installed.
If you see this message, exit the Platform Installer and complete the steps in Update Corretto for Solr above. Then restart the Platform Installer.
-
-
On the End User License Agreement screen, read the agreement and accept the terms.
-
Click Next.
-
Configure admin login using either:
-
SysInternals Autologon tool (recommended, encrypted):
or
Click the Autologon tool download link in the installer to get the tool, or browse to https://learn.microsoft.com/en-us/sysinternals/downloads/autologon.
-
Basic local user account (least secure, unencrypted):
or
Alternatively, do not use auto login on this server.
This option is not available if the server is already configured to use an admin login method.
-
-
Click Next.
-
On the Configuration > Search Configuration screen, enter a username and password for Solr and ensure that Override and configure SOLR specific settings is ticked.
Do not leave User Name and Password blank as it may cause later connection issues with Solr.
-
On the Configuration > IIS Settings screen, Webservice should be preselected with the correct Application Pool (NOMWebServicesAppPool).
-
Click Next to start installation.
Click Run in any prompts that appear.
-
Wait for installation to complete successfully.
-
Click Install Details.
-
Click Finish.
-
Recrawl existing data.
This screen does not appear if you already have Corretto 11 installed. However, you will still need to perform a recrawl when instructed in the After Server Restart section below.
Recrawling is required due to Solr being updated to a new version.
Recrawling may take a long time depending on how much data you have and the robustness of your server. Due to this you may want to complete your upgrade first, then proceed with a manual recrawl afterwards.
To recrawl after installation:
Recrawling is required due to the removal of the ENPS Data Service and Solr being updated to a new version.
Recrawling should be deferred until after upgrading:
-
Ensure that Re-crawling of data required is not ticked.
-
Click Close.
-
Perform the manual recrawl when instructed in the After Server Restart section below.
To recrawl now:
-
Ensure that Re-crawling of data required is ticked.
-
Click Execute Selected Steps.
The installer will open the News Object Manger in block mode, NOM Buddy Maintenance and NOM Maintenance and perform the recrawl.
-
Wait for the recrawl to complete successfully.
Do not continue with any other steps until complete.
-
Click OK to close the popup.
-
-
Click OK to close the installer.
Do not start NOM Watcher.
Post-installation
Before Server Restart
After Installation is complete and before restarting the server:
-
Open F:\NOM\NOM.ini in Notepad.
-
Ensure that the following setting exists in the
NOMsection of the file. If not, add it and save the file:
Continue with these steps:
-
If this server ingests FTP wires, confirm if the FTP wire log files (.DC) are in the NWP folder.
If not, restore them from the backup of the NWP folder created during Preparation.
-
Edit the NomWebServiceAppPool application pool:
-
Open Internet Information Services (IIS) Manager.
-
In the Connections pane, expand the server name and select Application Pools.
-
In the Application Pools pane on the right, right-click NomWebServiceAppPool and select Advanced Settings.
-
Set the Idle Time-out (minutes) option to 0 in the Advanced Settings popup.
-
Click OK.
-
Right-click NomWebServiceAppPool again and ensure that it is started.
-
-
Delete the contents of the F:\NOM\MOS\OUT folder if it exists.
Now restart the Buddy server.
After Server Restart
After restarting the Buddy Server:
-
Open the NOM Buddy Maintenance tool on the Primary Server.
-
Confirm that items are emptying to the Buddy server.
If not, try regenerating the schema on the Buddy Server by entering the following in a command prompt:
-
Open the News Wire Profiler on the Primary and Buddy Servers, and ensure that wires are coming in on both.
For any wires not coming in, try unticking and reticking their Active box.
-
At a convenient time, fail users over to the upgraded Buddy Server for a time with live shows to make sure it is fully functional.
Solr Recrawl
If you didn't perform a Solr recrawl during Installation then you must perform a manual recrawl now.
To do so, open a command prompt and enter:
Recrawling data does not impact users. It simply means that searching in ENPS will gradually become available on the server as data is reindexed.
Next Steps
You have now upgraded the Buddy Server!
Proceed to Upgrade Primary Server if not already done. Otherwise proceed to Upgrade Mobile Server if applicable.


