Macros
Macros let you automate tasks that you perform frequently in the ENPS Client. This can be anything from running a saved search to viewing the contents of a folder to inserting commands into a Story.
Macros are available through configurable shortcut keys and custom Ribbon menus. Users can access an unlimited number of macros by tapping the appropriate button on the Ribbon. Additionally, Personal and Group Folder macros can be assigned to keyboard shortcut keys. Each user can assign 23 personal macros. Folder managers can also assign 23 macros to group shortcut keys. All Macros - whether assigned to a key or not - are available from the Home tab on every Ribbon in the application.
Macro categories control where a Macro is allowed to run. This helps to ensure that Macros are not run in the wrong part of the application.

-
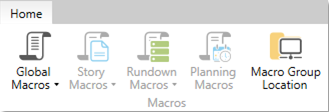
Global Macros can run anywhere within the ENPS Client at any time.
-
Rundown Macros can only be run while a Rundown is selected.
-
Story Macros can only be executed while a Story is selected.
-
Planning Macros can only be executed in a Planning Grid.
-
Macro Group Location Macros can be loaded from another group.
All four Macro categories are represented with their own buttons, with any out-of-category options disabled. If you are currently working in a Rundown, for example, only the Global Macros and Rundown Macros buttons will be active; the Story Macros and Planning Macros buttons will be disabled.
In versions prior to 9.3, ENPS did not strictly enforce these categories. As such, macros that worked in those previous versions will fail to execute in ENPS 9.3 and later if they were saved to the wrong category.
Macro Key Assignments
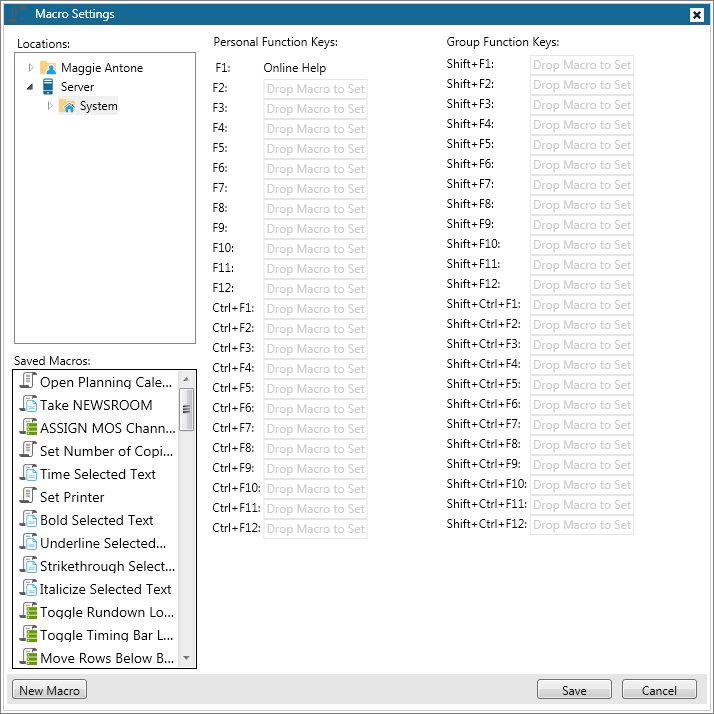
Open the Macro Settings window by selecting ![]() File Menu > Options > Macro Settings. This window displays the key assignments for your personal function keys, F2 to F12, and Ctrl F1 through Ctrl F12. It also displays all of the group function keys, Shift F1 through Shift F12 and Shift Ctrl F1 through Shift Ctrl F12.
File Menu > Options > Macro Settings. This window displays the key assignments for your personal function keys, F2 to F12, and Ctrl F1 through Ctrl F12. It also displays all of the group function keys, Shift F1 through Shift F12 and Shift Ctrl F1 through Shift Ctrl F12.

The Locations box at the top left lets you select your Personal Folder ![]() or a shared group location. A list of Macros contained in that folder will be displayed in the Saved Macros list box in the lower left corner of the window. You can now complete one of the following actions:
or a shared group location. A list of Macros contained in that folder will be displayed in the Saved Macros list box in the lower left corner of the window. You can now complete one of the following actions:
-
View or modify the Macro by double-clicking the Macro name.
-
To assign a Macro to a function key, drag it from the Saved Macros list box to the Drop Macro to Set box next to the appropriate function key. If you want to assign a Macro to a group function you must have Group Manager privileges. Any Macros that are not assigned to a function key combination can be run from the Home Tab tab on the Ribbon.
-
To delete a Macro, drag it to the Waste Bin.
Once a Macro is assigned to a function key it will display the Macro name.

You can replace a Macro assignment by dragging a different Macro into that function key.

You can remove the Macro assignment completely by clicking on the function key and then clicking on the trash can icon.
Create a Macro
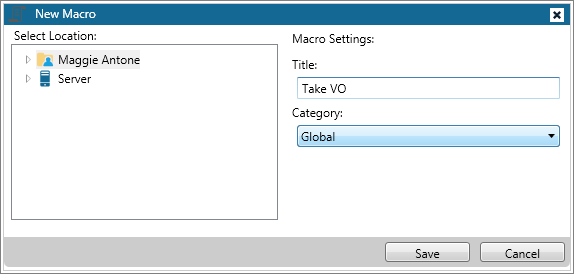
To create a new Macro, click the New Macro button in the lower left corner of the Macro Settings window or select ![]() File Menu > New Macro.
File Menu > New Macro.

In the Select Location box select whether you want to save the Macro into your Personal Folder or a group folder. In the Category drop-down box, select the Macro type. You can select Global, Rundown, Story, or Planning. Global Macros can be run anywhere in the ENPS Client but Story, Rundown, and Planning Macros will only be available in those respective areas. These categories are reflected on the Home Tab which is always present on the Ribbon. Click Save to continue. The Macro Editor window will appear.

In the Description text box, enter a description of what the Macro does. If you would like to change the name of your Macro you can rename it by double-clicking on the title tab, just as you would with Stories or Planning Items.
The Personal Function Key and Group Function Key drop-down menus allow you to select which function key will run the Macro. You will only be able to select a group function key if you have group manager permissions. After the Macro has been created, you can also set the function key assignments in the Macro Settings window.
On the left, the Available Actions list shows you which operations are available. To add an action, drag it from the list into the Macro Steps window. You can drag the action to the end of the list of current steps or between Steps already in the list. Steps in the Macro Steps window can be re-ordered by dragging and dropping. A Step can be removed from the Macro by clicking on its Waste Bin ![]() icon.
icon.
Some actions will allow you to enter additional parameters. These fields will appear in the Step Options box on the right.

If you are setting up a Macro that prints a story, for example, the Number of Copies box allows you to enter the number of copies to print every time you run the Macro. If you would like to be prompted for the number of copies every time you run the Macro, select the Prompt checkbox.
![]()
You can save your Macro by pressing Ctrl S or by selecting Save from the File Menu. Saving a Macro automatically checks that all required configuration information has been provided for all of its steps. You can run the same check before saving by clicking the Validate button on the Macro Ribbon. Once a Macro has been saved, it will show up in the Macro Settings window and under the appropriate category on the Home Tab of the Ribbon.
Load a Macro
You can load Macros from another group by selecting the Macro Group Location button to select a Group on the Ribbon.
![]()
Run a Macro

Once a Macro is created it can be accessed from the Home tab on the Ribbon. Click on the Macro type you want to run to display a list of Macros for that content type. Global Macros will be always be available, but Story and Rundown Macros will only be available in their respective items.
If you have assigned a shortcut key for a personal Macro or a group Macro you can also use that key combination to run the Macro.