Partition Drives
The partition sizes listed here are based on an average ENPS site.
General Rules
Use the following general rules for calculating the total working size for the drives:
| Drive type | General sizing rules |
|---|---|
|
RAID-1 |
Two identical drives which yield a space equal to the size of one of the drives. One drive can be lost and the server will continue to run. |
|
RAID-5 |
A minimum of three identical drives which yield space equal to the sum of all drives minus the size of one drive. For example, 3 x 36 GB drives will yield a working size of 72 GB. One drive could fail and the server would continue to run. |
Partition Sizes
For systems with multiple RAID arrays it is recommended that you have two physical disks in a RAID-1 mirror configuration with two NTFS partitions. If you are using a RAID-1 array it is recommended that you use 2 x 72 GB 10k RPM SCSI or larger drives to form the RAID-1 array.
|
Drive Letter |
Volume Name |
Minimum Size |
Recommended Size |
File Allocation Unit Size |
|---|---|---|---|---|
|
C: |
System |
Follow the Microsoft recommended drive size for your Operating System. |
4096 (Standard Windows default) |
|
|
D: |
CD-ROM |
|
|
|
|
E: |
Indexes |
100 GB* |
200 GB |
4096 (Standard Windows default) |
|
F: |
ENPS Work |
25 GB |
40 GB |
4096 (Standard Windows default) |
|
G: |
Wires |
15 GB |
30 GB |
4096 (Standard Windows default) |
|
H: |
Archives |
30 GB |
50+ GB** |
4096 (Standard Windows default) |
*On configurations with more space it is recommended that indexes are placed on a separate volume.
**Any extra space in your partitions should be allocated to the Archives volume.
If your organization retains wires for more than 100 hours, if your server ingests more than six wires, or if you have more than 150 users per server you should Contact Us for the recommended partition sizes for your site.
Best Performance Configuration
3 RAIDS (min. 6 drives)
|
1st RAID (level 1) |
2nd RAID (level 1) |
3rd RAID (level 1, 5 or 10) |
|---|---|---|
|
Operating System (C:\) |
Index (E:\) |
ENPS Work (F:, G:, H:\) |
Normal Performance Configuration for 64-bit systems
2 RAIDS (min. 4 drives)
|
1st RAID (level 1) |
2nd RAID (level 1, 5 or 10) |
|
|---|---|---|
|
Operating System (C:\) |
Index (E:\) |
ENPS Work (F:, G:, H:\) |
The recommendations above mean that sites which have previously run ENPS with only C: (system) and D: (index and ENPS data) drives in the past, should change their drive configurations to include at least 3 drives—system, index and ENPS data—when building 64-bit servers for use with ENPS.
For acceptable performance, the index should be on its own partition; for optimal performance it should also be on its own RAID array. Having the index and ENPS data on the same partition can slow down access to ENPS data during times of heavy indexer activity.
Configure Space
Configure the remaining drive space on the physical volume as a single volume. Use standard allocation unit size, and drive F:
-
Open Disk Management by typing
diskmgmt.mscat a command line or navigating there through Computer Management. -
Reassign any devices that are using the
F:drive. ENPS needs to use theF:drive.For example, if a CD-ROM drive is assigned to
F:, reassign it toD:or another available drive letter. To change a drive letter, right-click on the drive and select Change Drive Letter and Paths. -
Right-click on the unformatted disk partition and select Format.
-
Set Volume Type to Primary Partition, or to Simple Volume if you are using a dynamic disk.
-
Right-click the disk and select New Simple Volume to start the associated wizard.
-
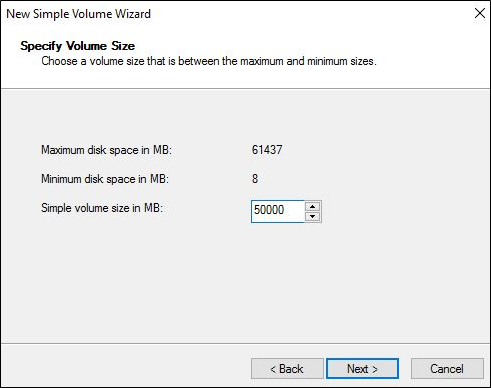
In the Specify Volume Size screen, enter the desired size of each drive in megabytes (MB).
-
Click Next.
-
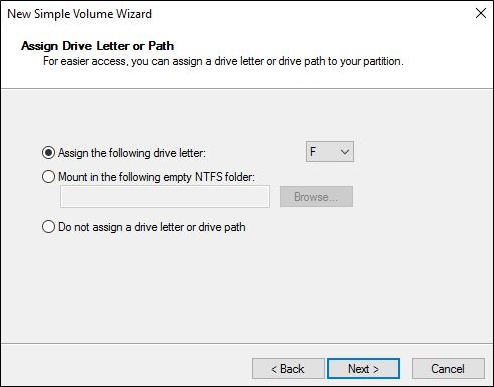
In the Assign Drive Letter or Path screen, select Assign the following drive letter > F.
-
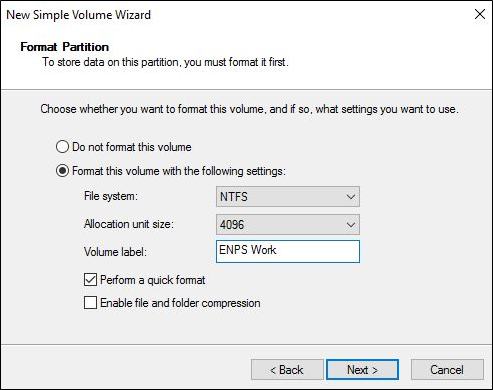
In the Format Partition screen, set the Allocation unit size and Volume label according to the Partition Sizes table above.
-
Click Next.
-
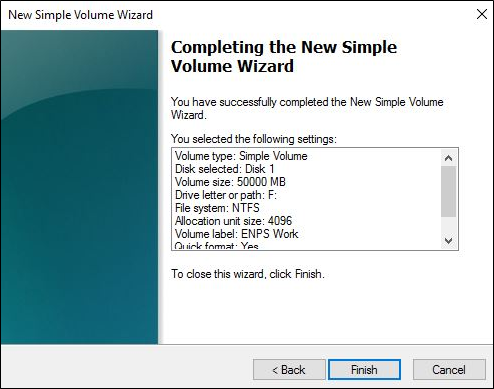
The Completing the New Simple Volume Wizard screen will appear, displaying the settings you selected for the drive.
Confirm that the settings for that drive are correct and click Finish.
-
Repeat the process for each drive in the Partition Sizes table.
Next Steps
Continue to the steps in Create the Application Pool.