Active Directory Integration
Active Directory integration was expanded in ENPS 9.6.1. If you are running ENPS 9.6.0 then some new functionality mentioned below will not be available.
ENPS staff accounts can optionally be managed in Active Directory (AD), without the use of System Maintenance.
To simply import users from AD rather than fully integrate ENPS with AD, see Import from Active Directory.
AD Security Groups are used to assign the user's Home folder. Nominated email accounts are notified when a new user is added to the Staff table, deactivated, reactivated, or moved to a different Home folder.
This integration is designed to allow the initial set up and configuration of user accounts in AD that are not already in the ENPS Staff table. It does not prevent a user’s Staff table metadata from being subsequently edited with System Maintenance.
When using AD integration, users can only be added and deleted to ENPS through the AD interface. Users cannot be added or deleted using the Staff table in System Maintenance.
Users in the Staff table without active AD accounts will be deactivated.
Pre-requisites
The following pre-requisites apply for ENPS AD integration:
-
You must be using an AD domain account for the ENPS servers, not a local account.
-
The account must have Write privileges to the AD database.
-
Optionally, there should be an account on the mail server which can be used to notify administrators of changes.
Choose Integration Method
Either directly connect ENPS to an existing AD structure (added in ENPS 9.6.1), or manually export existing ENPS groups to AD.
Connect to Existing AD Structure
Added in ENPS 9.6.1.
Use this method to connect ENPS to an existing AD setup, allowing all administration for that group to be undertaken in Active Directory. This supports organizations with mature AD structures that prefer to reuse established group hierarchies and naming.
For example, when a user is added to an AD group, the respective ENPS staff table will be updated with their respective UserID, Name and Home folder within ENPS.
To map an AD entity to an ENPS group:
-
Open System Maintenance > Groups.
-
Create a new group to use as an AD group.
-
Set that group's AD Group field to match the entity name you want to map to in AD.
-
Click Save.
The group is now mapped to the existing AD entity.
Export ENPS Groups to AD
The next step is to create the AD security groups that represent users’ Home folders.
Follow these steps that use the export functionality:
-
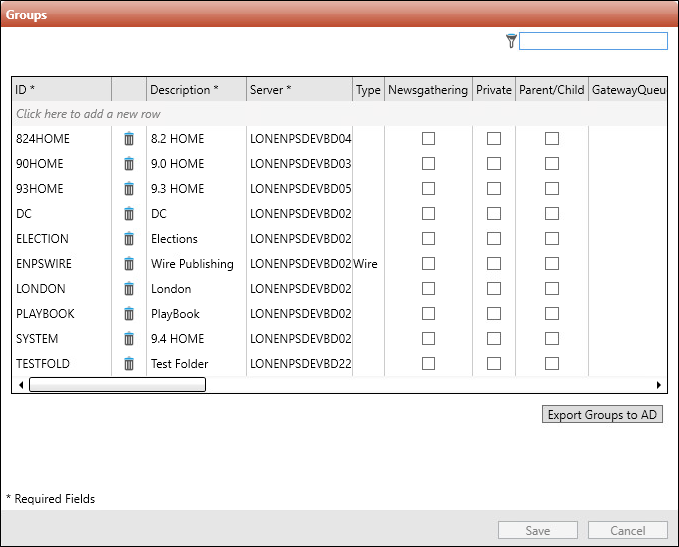
Open System Maintenance > Groups.
-
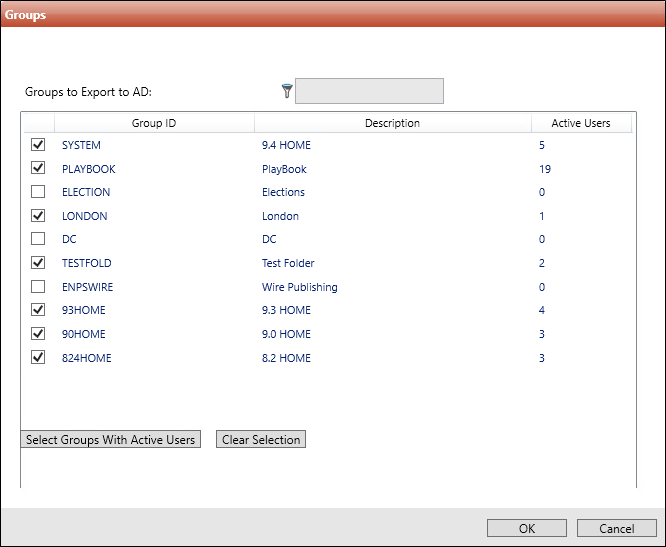
Click the Export Groups to AD button to open a new page in the Groups pane.
The Active Users column shows how many users are homed to each group.
-
Tick each group that you want to export.
When setting up for the first time, we recommend selecting the groups by clicking the Select Groups with Active users button to tick all folders that have at least one user homed to them. Exporting folders without homed users adds clutter in AD and serves no purpose, unless you plan to home users to that group in future.
You can also filter this list to find a particular folder. This can be useful if a new group is added to the table after AD integration has been set up, as in this scenario you only want to export the new folder.
-
Click OK to export the selection to AD.
Refresh the view in AD to see the new security groups with the naming convention ENPS_GROUPID_GROUPDESCRIPTION at the root of the domain.
If desired, you can move these groups out of the root and into Organizational Units. For example, in the following screenshot, they have been moved into an Organizational Unit called ENPS.
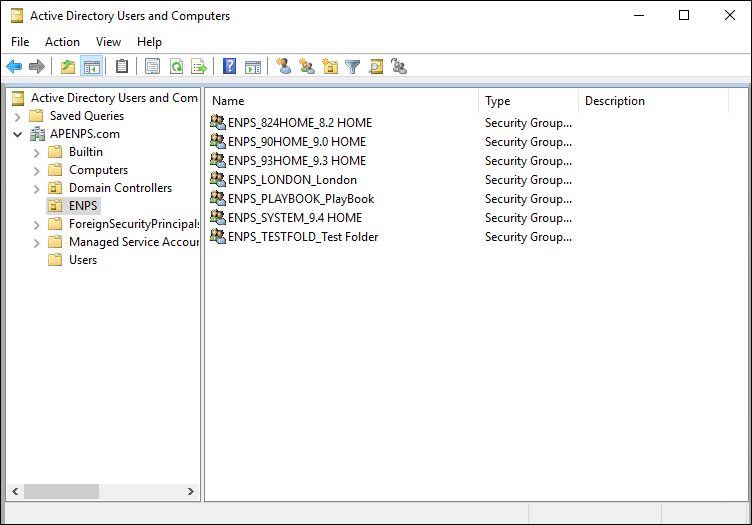
Each of these exported groups will contain all user accounts homed to that group.
Activate Integration
Regardless of the integration method chosen, once email configuration and security groups have been set up, ENPS AD integration needs to be activated. To do so:
-
Open System Maintenance.
-
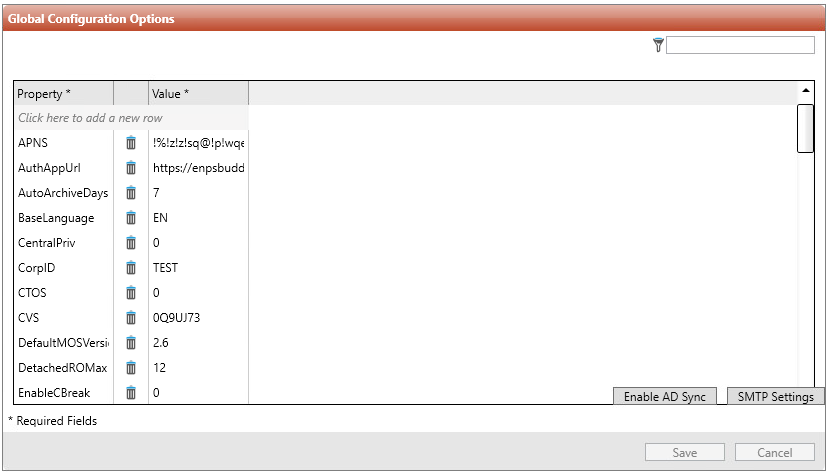
Click Global Configuration Options.
-
Click the Enable AD Sync button.
-
Click Save.
ENPS AD Integration is now active.
Users can now only be added to ENPS and deactivated / reactivated / given a new Home Folder through the AD interface. These actions are not permitted in the System Maintenance > Staff table.
Users in the Staff table without active AD accounts are now deactivated.
Local User Accounts
Added in 9.6.1.
Even when AD integration is enabled, you may want to manage a specific user account locally in ENPS without that account being affected by AD. For example, when AD authentication or lifecycle management is not appropriate, such as needing temporary or emergency access.
To configure a user account as local, unconnected to AD:
-
Open System Maintenance > Staff table.
-
Tick the Local User column.
-
Click Save.
The local account is now explicitly excluded from AD rules and synchronization.
The Active column is greyed out for user accounts connected to AD.
Creating a new user in ENPS via Active Directory
To create a new user in ENPS via AD, follow these steps:
-
Create a new user account in Active Directory.
-
Assign the new user to an ENPS group.
-
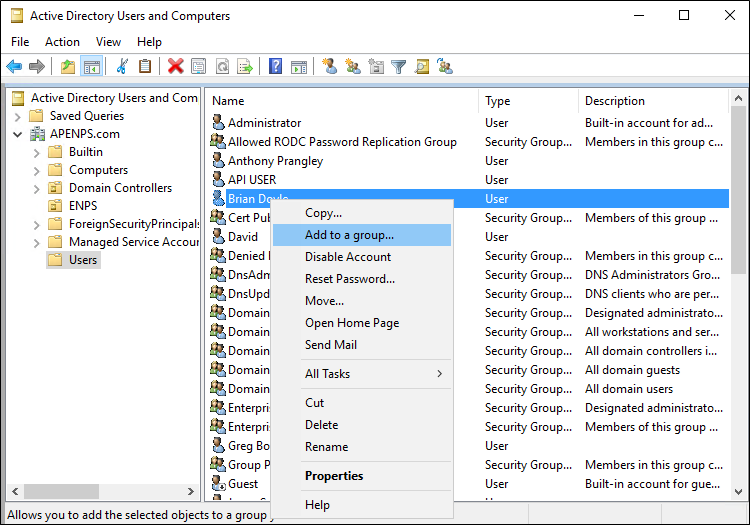
Right-click the user in AD and select Add to a Group... to open the Select Groups dialog.
-
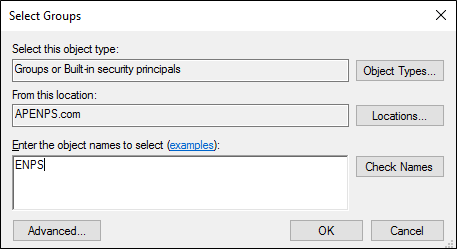
Enter ENPS in the Enter the object names to select textbox.
-
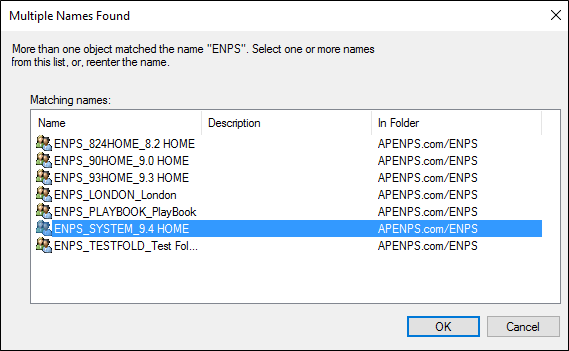
Click OK to see a list all ENPS groups.
-
Select one group to add the user to, then click OK.
Although AD does not prevent a user being added to more than one ENPS security group, ENPS only supports a single Home folder per user.
Adding an account to multiple ENPS security groups will generate an error condition, and AD synchronization will be suspended until the problem is resolved.
-
After a few seconds the user will appear in the Staff table with the correct Home folder, and an email is sent to the address(es) configured for the relevant server.
After the initial account creation in AD that populates the Staff table, subsequent changes to the user's name in AD are not reflected in the Staff table.
Delete a User in ENPS when Deleted from Active Directory
Added in ENPS 9.6.1.
AD integration can ensure that when users are deleted from AD they are also deleted in ENPS.
To configure this behavior:
-
Open the System Maintenance > Global Configuration Options table.
-
Set the ADAllowUserDelete option:
0- Disabled1- Enabled (also delete in ENPS) -
Click Save.
Note that this only takes effect if the overarching ADSync setting is also enabled.
Rehoming a User Created via Active Directory
To manually rehome a user, follow these steps.
-
Find the user in AD.
-
Right-click the user.
-
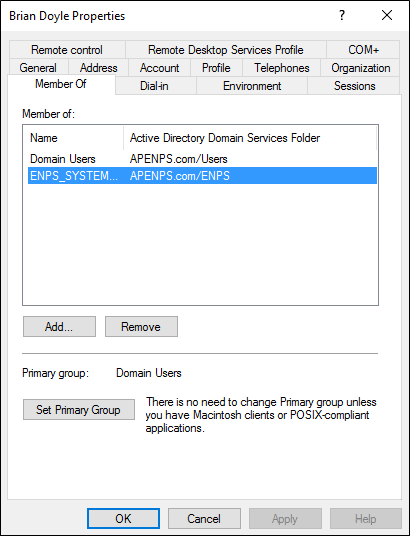
Select Properties and open the Member of tab.
-
Select the existing ENPS group, which starts with ENPS in the Name column.
-
Click Remove to remove the user from that group.
-
Click Add....
-
Enter ENPS in the Enter the object names to select textbox.
-
Click OK to see a list all ENPS groups.
-
Select one group to add the user to, then click OK.
The user is now rehomed to the selected AD group.
Set up email notifications
Specified recipients such as administrators can be notified by email when user accounts:
-
are created and homed to the server
-
are activated
-
are deactivated
-
have their Home folder changed
-
are deleted
Enable these email notifications by setting up a sender and list of recipients.
Set up sender
To set up the account that will send the email notifications, follow these steps:
-
Open System Maintenance.
-
Click Global Configuration Options.
-
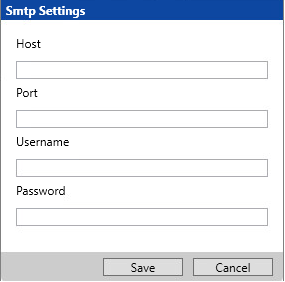
Click the SMTP Settings button to open the SMPT Settings dialog.
-
Configure the settings:
-
Host - e.g. smtp.office365.com
-
Port - typically 587
-
Username and Password - the account that will send the emails, e.g. ADENPSChanges@domain.com
-
-
Click Save in the dialog.
-
Add the SmtpFromEmail key to the Global Configuration Options.
-
Set the SmtpFromEmail key value to the account that will send the emails.
For example, ADENPSChanges@domain.com.
-
Click Save.
These values are saved to the SMTP key in Global Configuration Options.
Note that the stored values will not be displayed in the SMTP Settings dialog if you press the SMTP Settings button again.
Set up recipients
To set up the accounts that will receive the email notifications, follow these steps:
-
Open System Maintenance.
-
Click Servers.
Note the Admin Emails column at the end of table.
-
For each server in the server list that houses at least one Home folder, enter a list of recipient email addresses in the Admin Emails column.
The addresses must be separated by semi-colons. For example, ana@domain.com;bob@domain.com;cat@domain.com
-
Click Save.
The sender and recipients are now set up to send and receive notifications respectively.
Error conditions
Logfiles provide a history of transactions. They are saved to the \NOM\Logs directory on your Central Server.
Real-time status reporting can be seen at https://<CentralServer>/:10505/adsync.aspx.
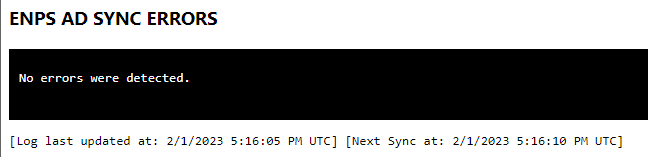
The following unsupported scenarios can stall AD synchronization and cause an error to be displayed on that webpage:
-
Adding a user to more than one AD group.
-
Creating a user without a first name and last name.
You need to resolve any errors to allow AD Synchronization to continue.
Deactivating ENPS/Active Directory Integration
To stop using Active Directory to manage staff in your ENPS system, disable integration as follows:
-
Open System Maintenance > Global Configuration Options.
-
Delete the ADSync setting.
-
Click Save.
