Upgrade Primary Server (pre-9.0.0.230)
This applies to upgrading from ENPS versions earlier than 9.0.0.230. See Upgrade from ENPS version 9.0.0.230 or later to upgrade from later versions.
Preparation
You should already have upgraded the Buddy Server. If not then do so now. See Upgrade Buddy Server (pre-9.0.0.230).
Before you start the upgrade process, make sure you do the following on the Primary Server.
Check for G_FIELD Issues
This should already have been checked on the Primary Server during the Buddy Server upgrade. See Check for G_FIELD Issues for information.
Check for Windows Updates
Check for Windows updates on the Buddy Server, installing and then rebooting the server at a convenient time.
Do not reboot both ENPS servers at the same time.
Update .NET Framework
Ensure that .NET Framework version 4.8 is installed:
-
on the server
-
on all machines that will run the ENPS client
Check the current installed version using the Platform Installer or the registry:
Platform installer
You do not need to close any ENPS processes, just run the Platform Installer. When you get to the following screen it will show you if a required element is missing:
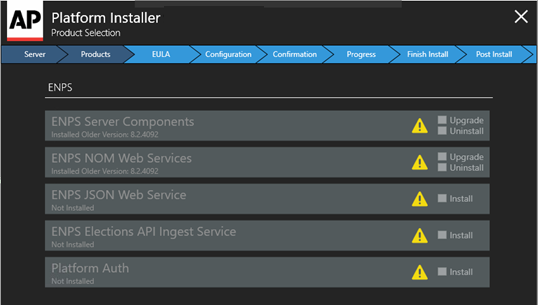
You can then add/fix whatever is missing, then exit out of the installer until you’re ready to install ENPS.
In the screenshot above, the Platform Installer displays the caution triangle indicating that .NET Framework 4.8 is required.
A link to download .NET Framework 4.8 is provided when the caution triangle is clicked.
.NET requires a reboot. Find a safe time to fail users to the Buddy and upgrade just.NET in preparation of your upgrade, or you can do this as the first step of your Primary upgrade. Make sure you are properly failing users to the Buddy prior to a reboot.
Registry
-
From the Start menu, choose Run, enter regedit, and then select OK.
-
In the Registry Editor, open the following subkey: HKEY_LOCAL_MACHINE\SOFTWARE\Microsoft\NET Framework Setup\NDP\v4\Full. If the Full subkey isn't present, then .NET Framework 4.5 or later is not installed.
-
Check for a REG_DWORD entry named Release. If it exists, then you have .NET Framework 4.5 or later installed. Its value corresponds to a particular version of .NET Framework.
-
For .NET Framework 4.8 that value must be 528040 or greater
.NET Framework version
Minimum value
.NET Framework 4.7.2
461808
.NET Framework 4.8
528040
.NET Framework 4.8.1
533320
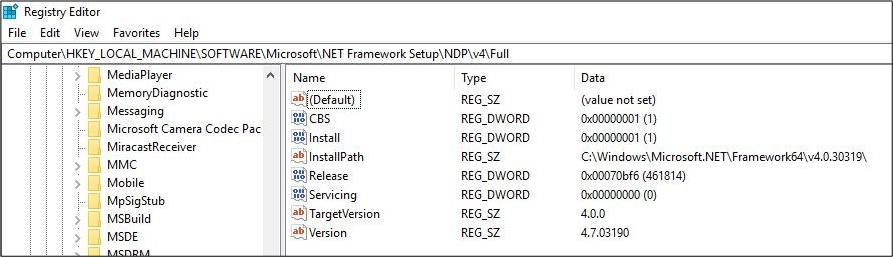
In the example below .NET Framework 4.7.2 is installed, as the release number is 461814 (Higher than 461808 but lower than 528040).
Check for Unexpected Folders
Check the F:\Common folder for unexpected subfolders.
AUDIT, BUDDY, C_SUPPORT, DBSCRIPTS, ELECTION, G_SUPPORT, and G_SUPPORTBACKUP are expected. Any other folders are should be deleted or moved to the C:\ drive.
Create a Backups Folder
Create a backups folder on your desktop and then copy the following files and folders into the folder:
C:\inetpub\wwwroot
E:\Search Server\data\enps\conf (if applicable - legacy from v8.2.X)
E:\Search Server\SOLRJavaService (where applicable)
F:\Common\G_Support
F:\ENPS
F:\NOM\nom.ini
F:\NOM\AC
F:\NWP
F:\SearchServer
F:\ServerName\S_SUPPORT
F:\ServerName\S_PRIV
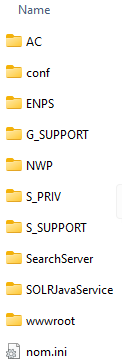
The backups folder should now look like this:
Check Data is in XML Format
Confirm that all of your data is in XML format, otherwise data will not appear in searches.
One way to confirm this is by checking whether the oldest archives on your servers are in XML format.
See Convert Data to XML Format for instructions on converting any non-XML files in your data. Content created with ENPS 7 and later is already in XML format, though older archives may not be.
Find AP Media API Key
In this version of ENPS you can ingest your AP Media API wires directly onto your server instead of to a separate box.
To set this up you’ll need to find your AP Media API key:
-
Log into AP Newsroom.
Instructions for logging in were sent in a Welcome Letter from the AP. Contact Us if you nor anyone at your site cannot find this letter and cannot find existing login credentials.
-
Select the option for the AP Media API key in the navigation menu to see the key.
You'll use this key later in the Set Up AP Media API section to set up your AP wires, after you’ve upgraded the server.
Set WebService Version
-
Open System Maintenance > Services.
-
Remove any number before
.svcat the end of the Address URL for the Primary Server webservice.For example, change:
../nomwebservices3/nomwebservice82.svcto
../nomwebservices3/nomwebservice.svc. -
Set the ServiceVersion for the Primary Server webservice to 9.
These changes were also made when upgrading the Buddy Server. The table should now look something like:

-
Save changes.
Check Buddy Queue
Confirm there is no Buddy Queue built up on the Primary or server.
-
Open NOM Buddy Maintenance.
-
Ensure there are no persistent files in the top window.
-
Double-check this by opening that the F:\Common\Buddy folder on the Primary server and checking that it is empty.
If this folder is not empty, before proceeding Contact Us for help on emptying this folder to the Buddy server.
Switch Users to the Buddy Server
Remind users that they will see failover messages throughout the upgrade process. Users can continue working without interruption.
Switch users to the Buddy NOM by blocking the NOM on the Primary Server:
-
Open the NOM Buddy Maintenance tool on the Primary server.
-
Ensure there is no queue in the top window.
-
Open the News Object Manager (NOM) on the Primary server.
-
Open Window > NOM Configuration/Status and ensure the Block Primary Access box is ticked.
-
Confirm that users can work on the Buddy Server
Close all ENPS components on the Primary Server, starting with NOM Watcher.
Prepare Search
Purge the index in preparation for a recrawl:
-
Open a Command Prompt.
-
Enter the following:
This command is case-sensitive, and there is a space after .exe before the /
Additionally, change the status of the ENPSDataService, SOLRJavaServer and Windows Search services:
-
Open Windows Services (services.msc).
-
Right-click the ENPSDataService service from the list.
-
Select Stop from the popup menu.
-
Right-click the SOLRJavaServer service from the list.
-
Select Stop from the popup menu.
-
Right-click the Windows Search service in the list.
-
Select Properties to open a dialog box.
-
Click Stop.
-
Set General tab > Startup type to Disabled.
Remove Watch.exe
Remove the Watch.exe shortcut from the startup folders:
-
Click Start, type
Runand enter the following in the Run dialog to open the first startup folder: -
Remove the Watch.exe shortcut from the folder if it exists.
-
Click Start, type
Runand enter the following in the Run dialog to open the second startup folder: -
Remove the Watch.exe shortcut from the folder if it exists.
Uninstall Java SDK and RTE
Uninstall any versions of Java SDK and RTE in preparation for installing/updating Amazon Corretto:
-
Open
 Start Menu > Apps & Features.
 -
Search the apps list for Java SDK.
Delete any installations found.
-
Search the apps list for Java RTE.
Delete any installations found.
Corretto for Solr
ENPS requires Amazon Corretto OpenJDK Coretto version 17, which will be automatically installed by the Platform Installer.
All versions of Corretto other than version 17 must be removed now. Do not install any higher or lower versions of Corretto.
To uninstall versions of Corretto other than version 17:
-
Open
Start Menu > Apps & Features. -
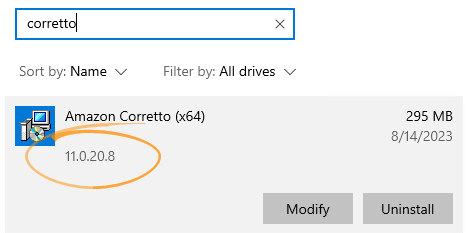
Search the apps list for Corretto.
-
Click on each Corretto entry to check the version.
-
Uninstall all Corretto installations that are not version 17.
If you can't uninstall Corretto because it is still in use:
-
Open Task Manager.
-
Open the Services tab.
-
Right-click SolrJavaService in the list and select Stop from the popup menu.
-
Try uninstalling Corretto again.
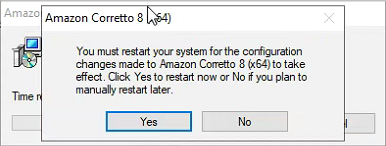
If prompted to restart your system:
-
Remove the Watch.exe shortcut from the startup folders:
-
Click Start, type
Runand enter the following in the Run dialog to open the first startup folder: -
Remove the Watch.exe shortcut from the folder if it exists.
-
Click Start, type
Runand enter the following in the Run dialog to open the second startup folder: -
Remove the Watch.exe shortcut from the folder if it exists.
-
-
Click Yes to restart.
-
For details about using Solr in ENPS, see Solr Search.
Installation
Once all Preparation is complete, continue with installation:
-
Right-click on the ENPS Platform Installer .zip file downloaded in Download Installer and select Properties.
-
Ensure that the General tab > Unblock box is ticked if it exists, then click OK.
-
Extract the contents of the Platform Installer zip file to the root of the ENPS Work Drive, which is usually the F: drive:
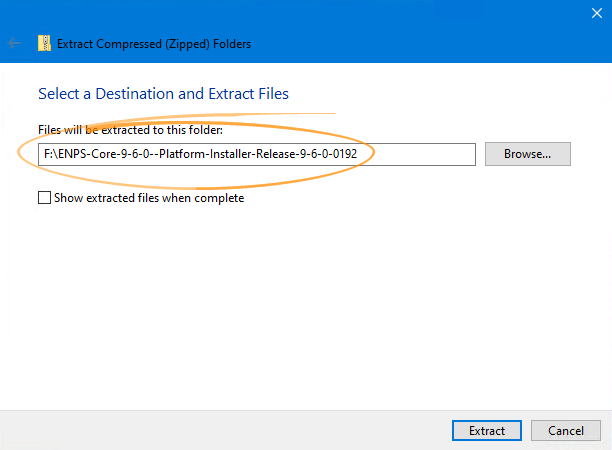
Do not extract to a different location, such as the Downloads folder. If extracted to another location such as the Downloads folder, the Platform Installer may crash or get stuck when run.
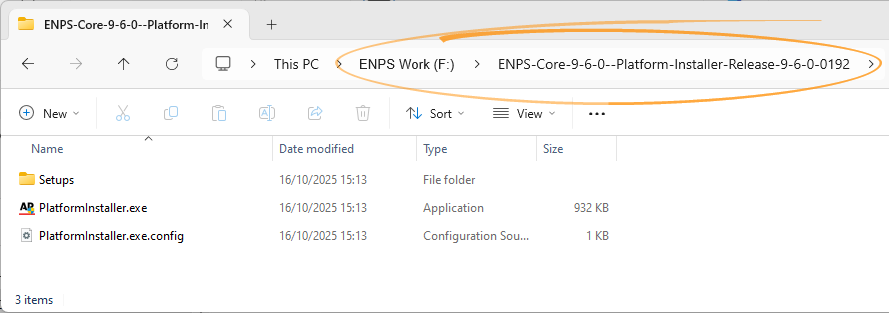
This creates the following files/folders at the root of the F drive:
-
Run the PlatformInstaller.exe file from that location to start the Platform Installer.
If the Platform Installer crashes or gets stuck, do not restart it. Contact Us immediately.
If the following popup appears then click Yes.
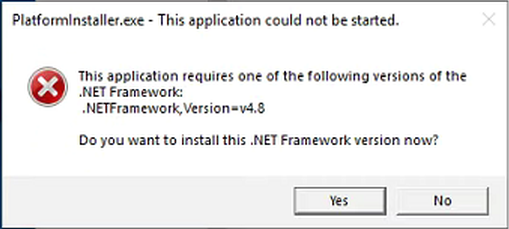
If you are running Windows Server 2019 or older you may see an error that the operating system does not support .NET 4.8.1. If so, click OK and manually download and install .NET 4.8 (not 4.8.1) from here: https://dotnet.microsoft.com/en-us/download/dotnet-framework/net48
Then return to this step to re-run the Platform Installer.
-
Select ENPS on the Server Type screen.
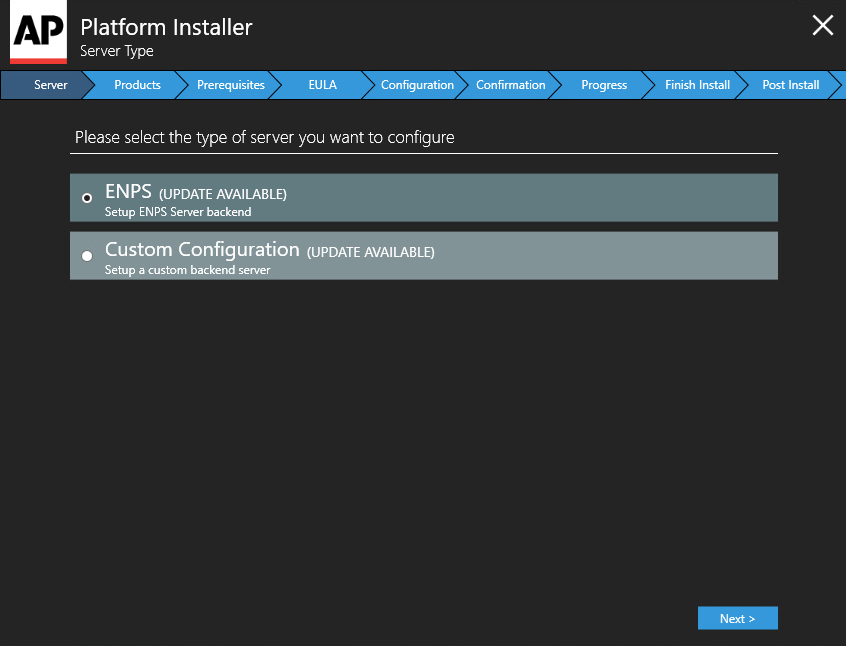
-
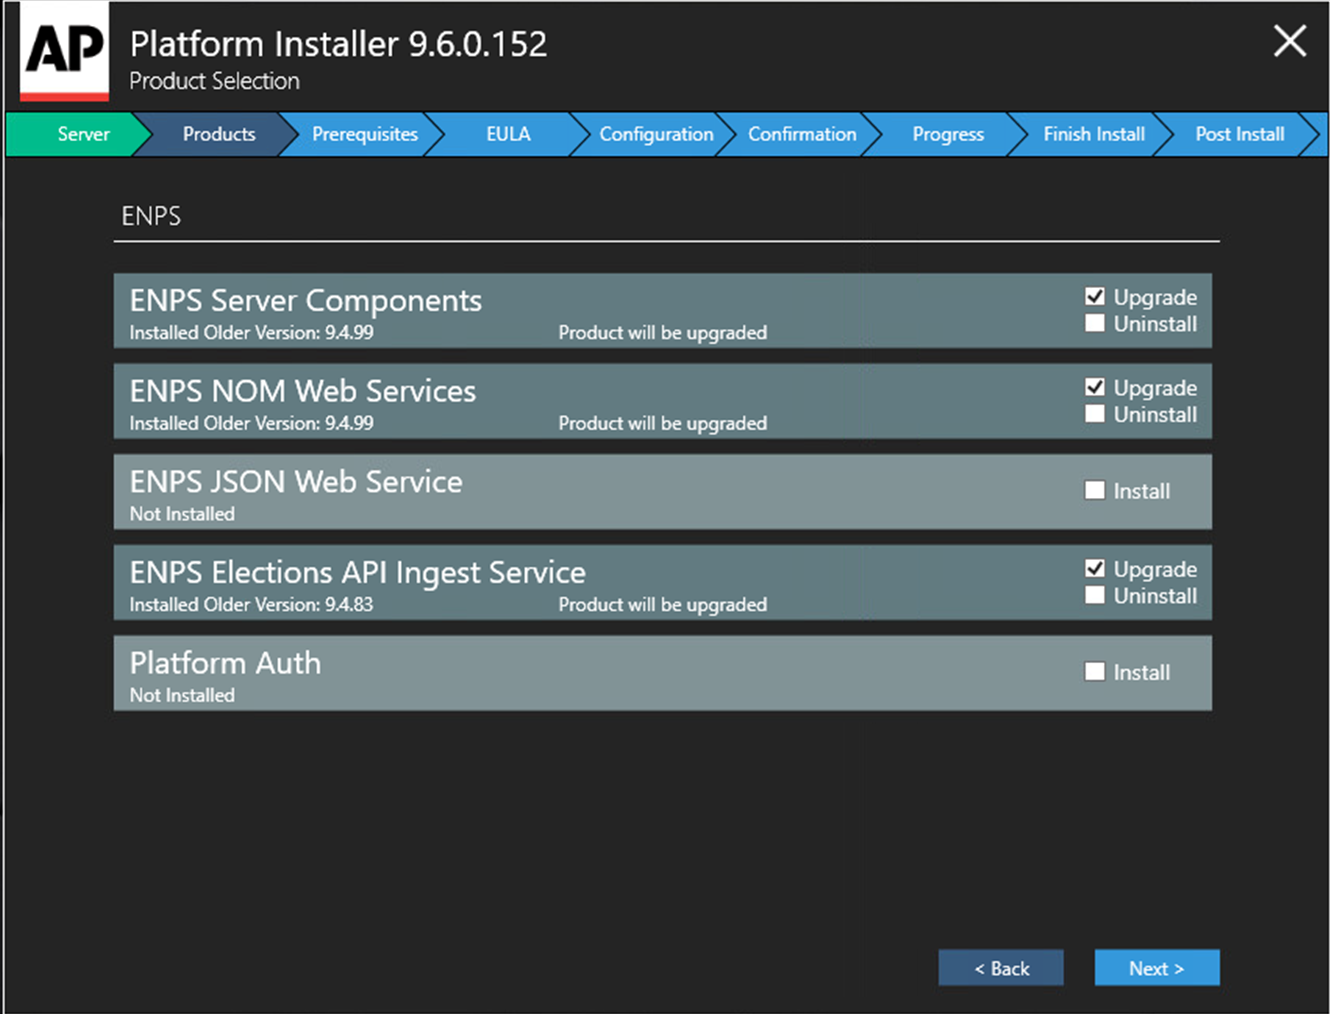
On the Product Selection screen select the following for a typical ENPS installation:
-
ENPS Server Components - Upgrade
-
ENPS NOM Web Services - Upgrade
-
ENPS Elections API Ingest Service - Upgrade or Install
Your screen should look like this:
The installer will flag if the server does not meet certain prerequisites, such as the required version of Corretto installed.
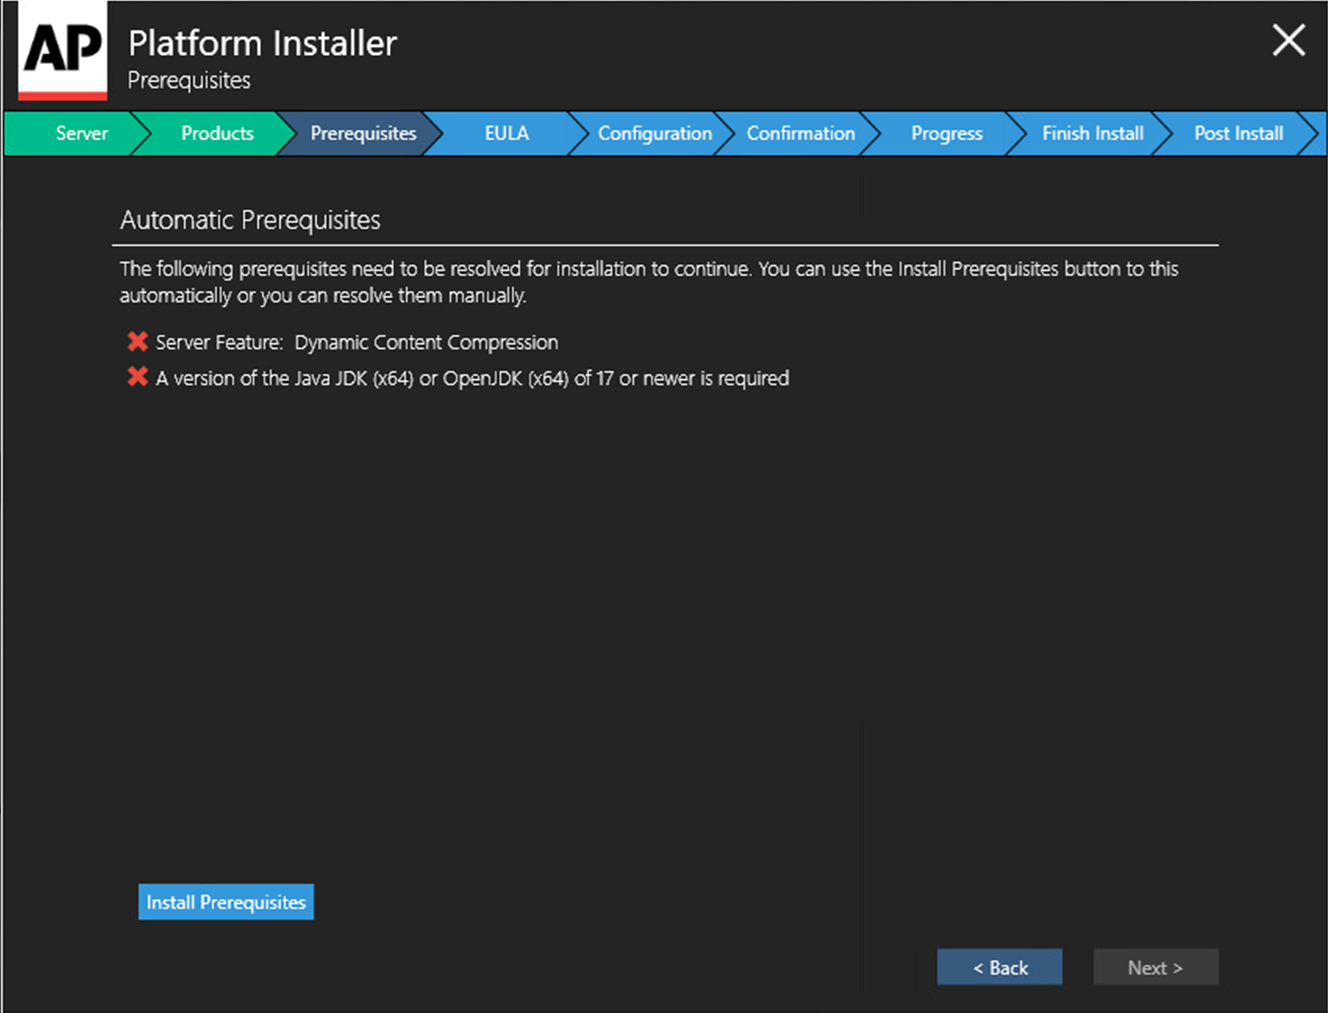
As of ENPS 9.6.1, this now ensures that all server Roles and Features prerequisites are met.
If you see this message, click Install Requirements. If you are instructed to reboot before continuing then exit the Platform Installer, take Watch out of startup, reboot the server, then re-run the Platform Installer.
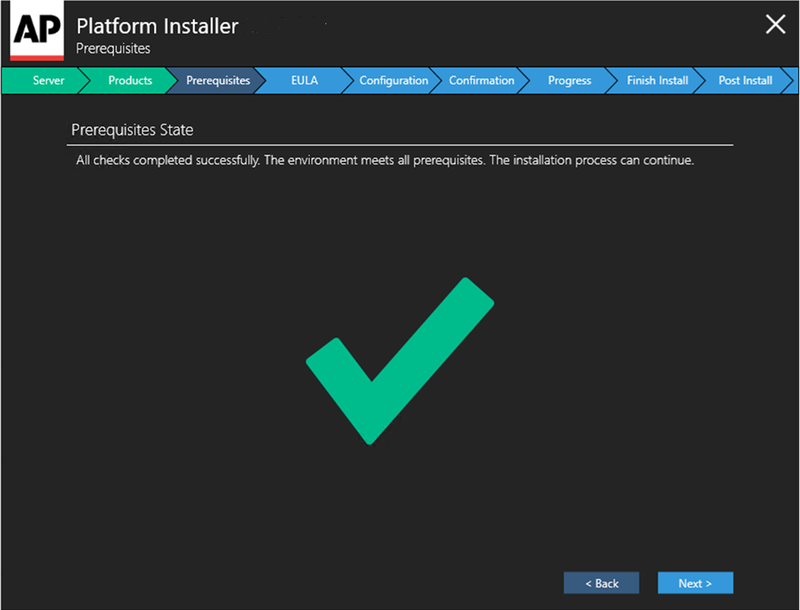
Click Next if all prerequisites are met:
-
-
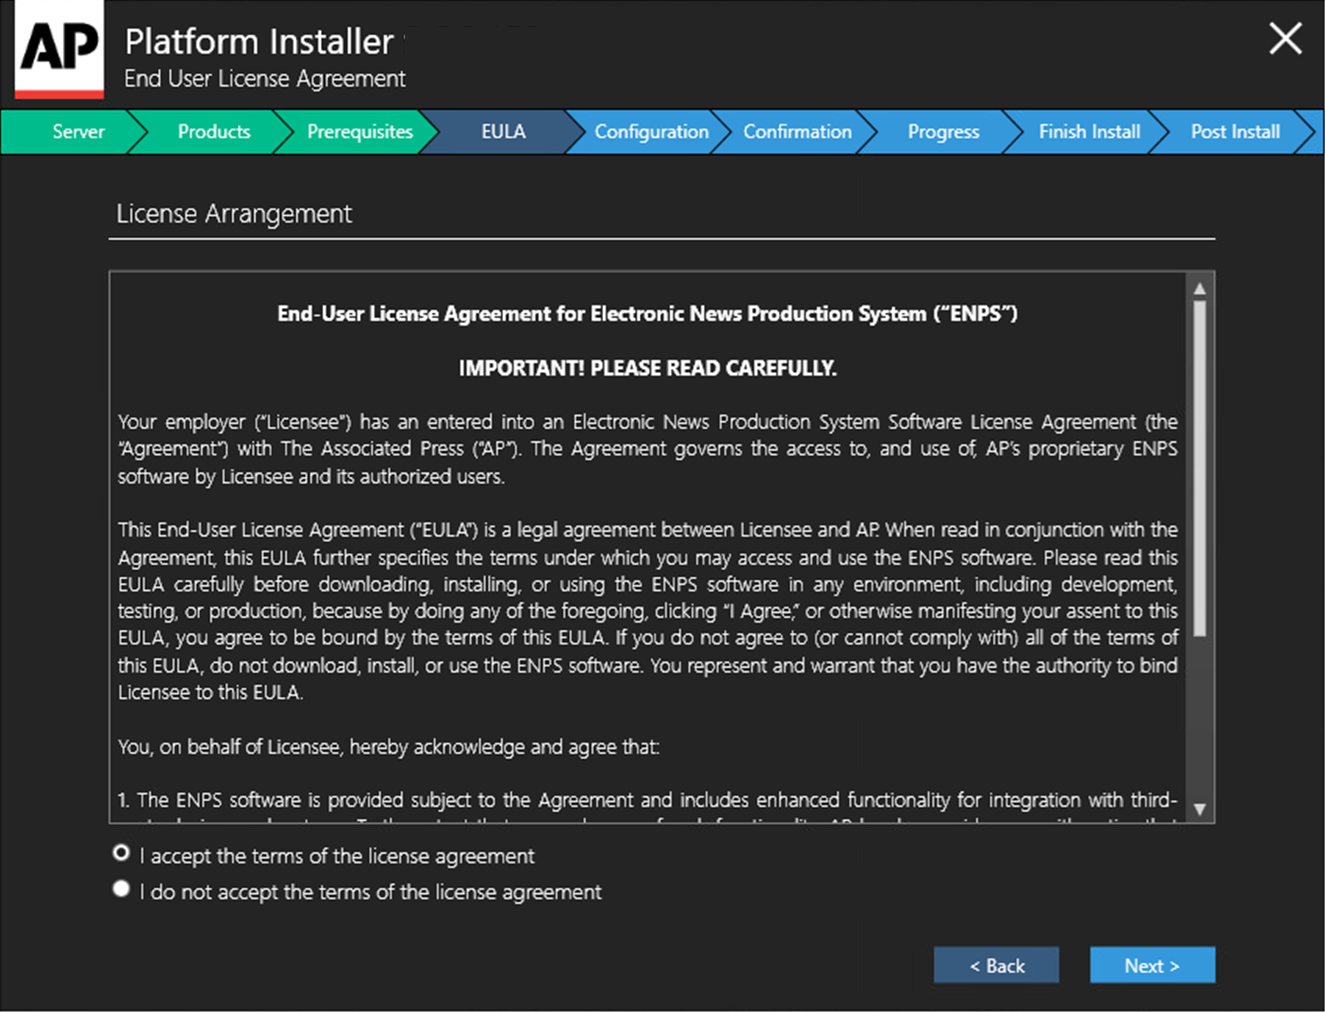
On the End User License Agreement screen, read the agreement and accept the terms.
-
Click Next.
-
Configure admin login using either:
-
SysInternals Autologon tool (recommended, encrypted):
Click the Autologon tool download link in the installer to get the tool, or browse to https://learn.microsoft.com/en-us/sysinternals/downloads/autologon.
-
Basic local user account (least secure, unencrypted):
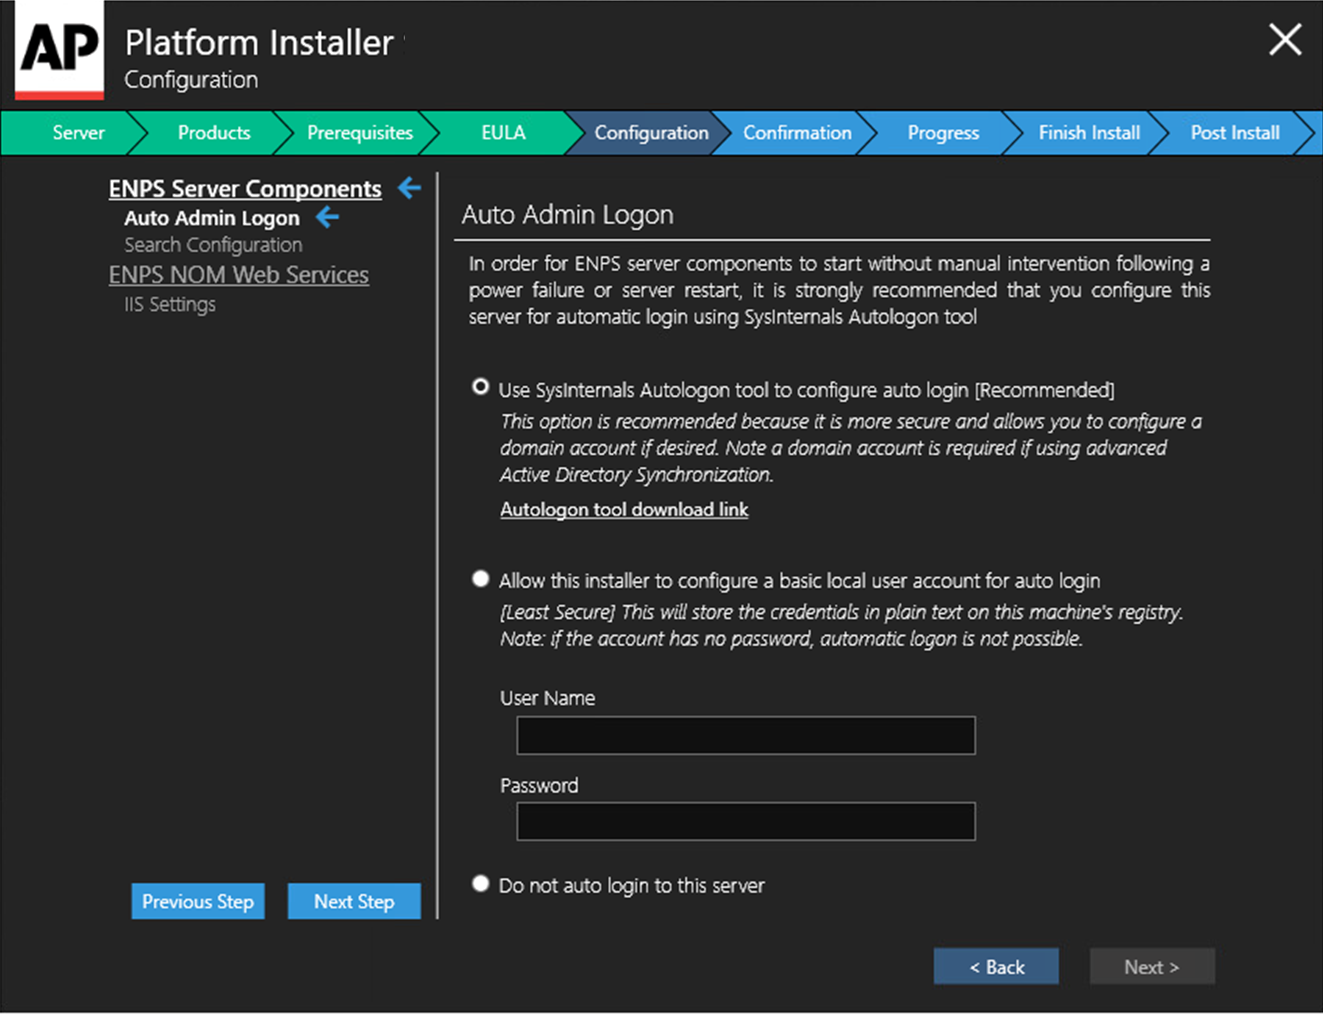
Alternatively, do not use auto login on this server.
The actual screens shown in this step depend on what you already have configured. The Do not auto login to this server option is not available if the server is already configured to use an admin login method.
-
-
Click Next.
-
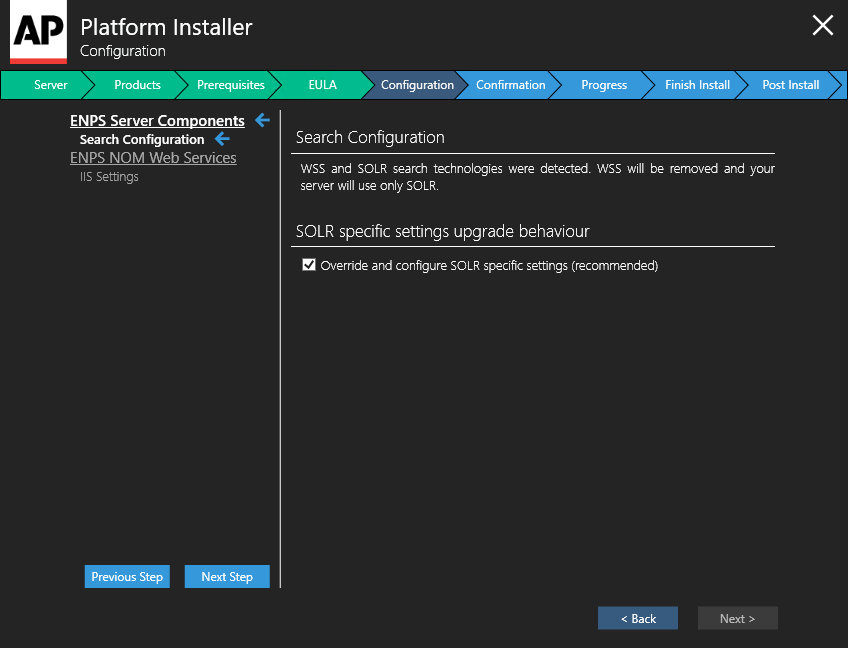
On the Configuration > Search Configuration screen, you will see one of the following sets of options depending on which version of ENPS you are upgrading from:
-
Ensure that Override and configure SOLR Specific settings is ticked if you see this screen:
-
Enter a username and password for Solr and ensure that Override and configure SOLR specific settings is ticked if you see this screen:
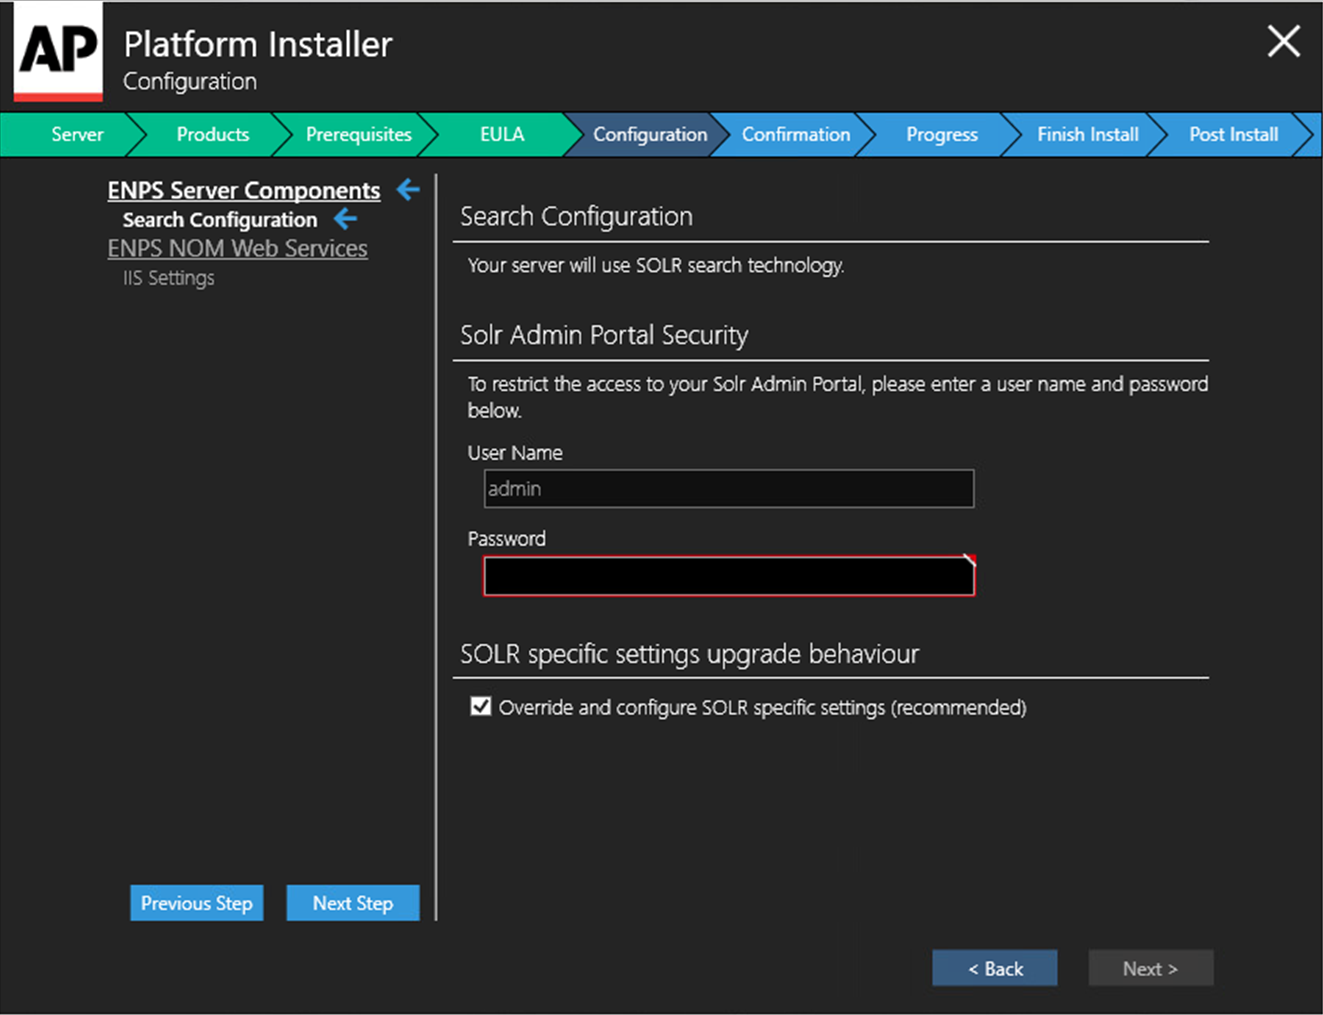
Do not forget the User Name and Password as they are required to connect with Solr.
-
-
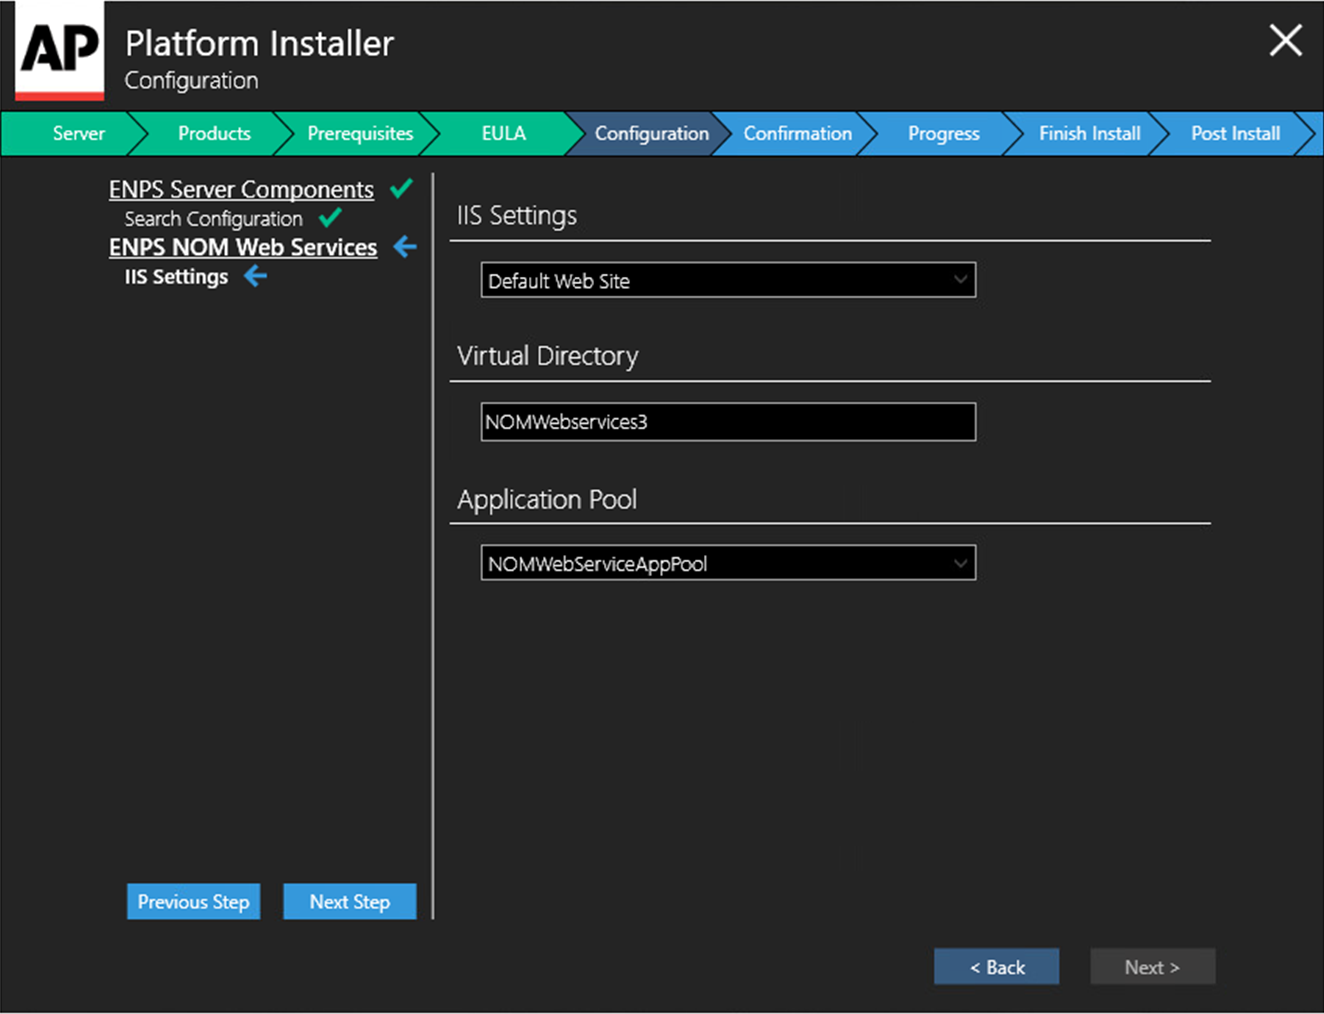
On the Configuration > IIS Settings screen, Webservice should be preselected with the correct Application Pool (NOMWebServicesAppPool).
-
Click Next Step.
-
Click Next.
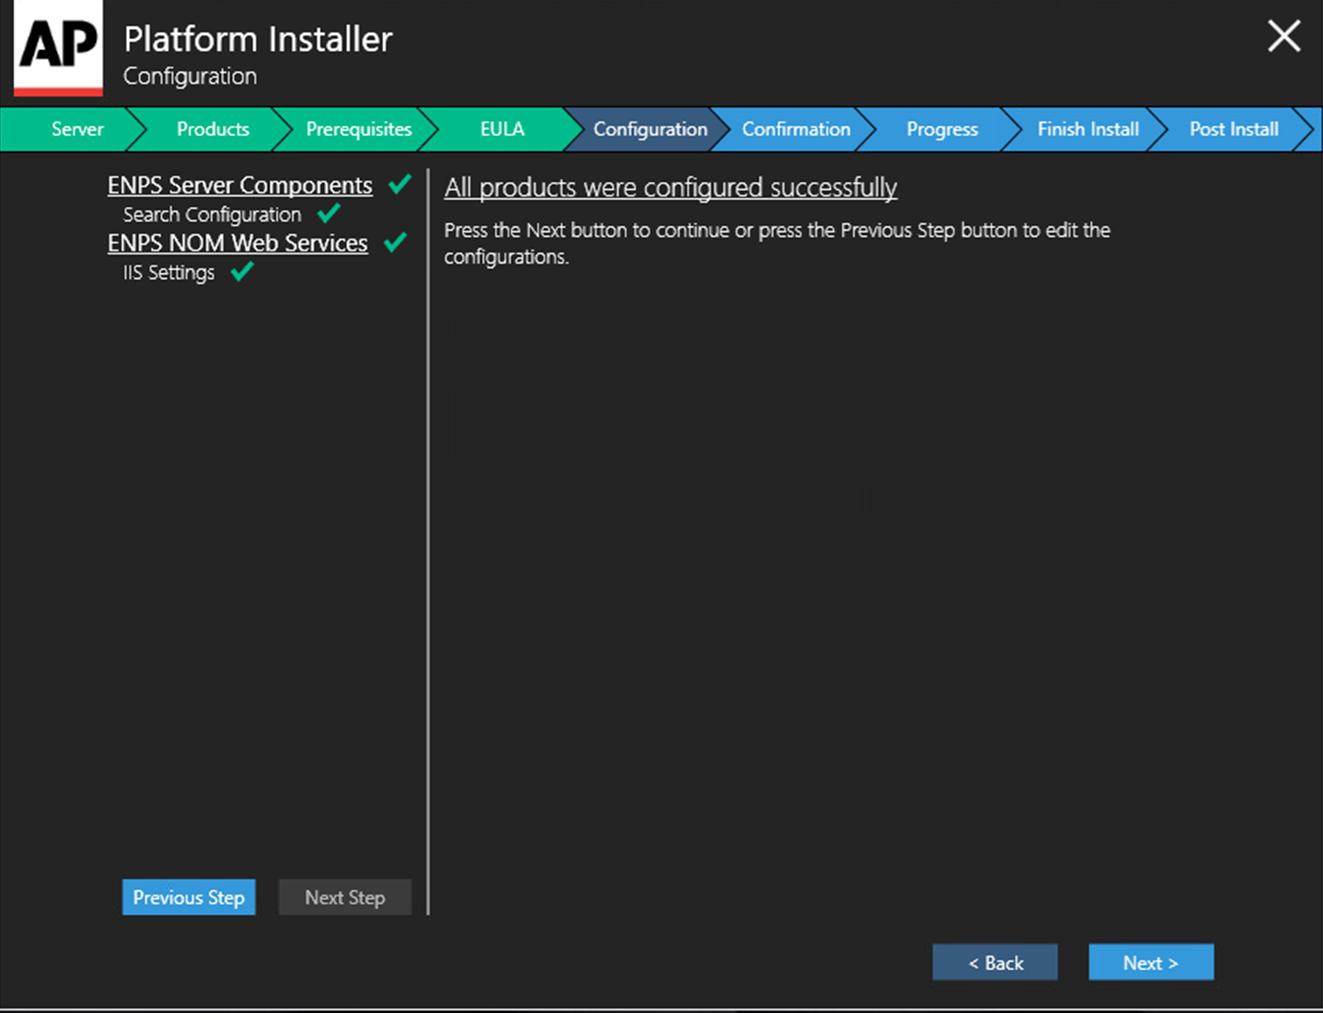
Click Run in any prompts that appear.
-
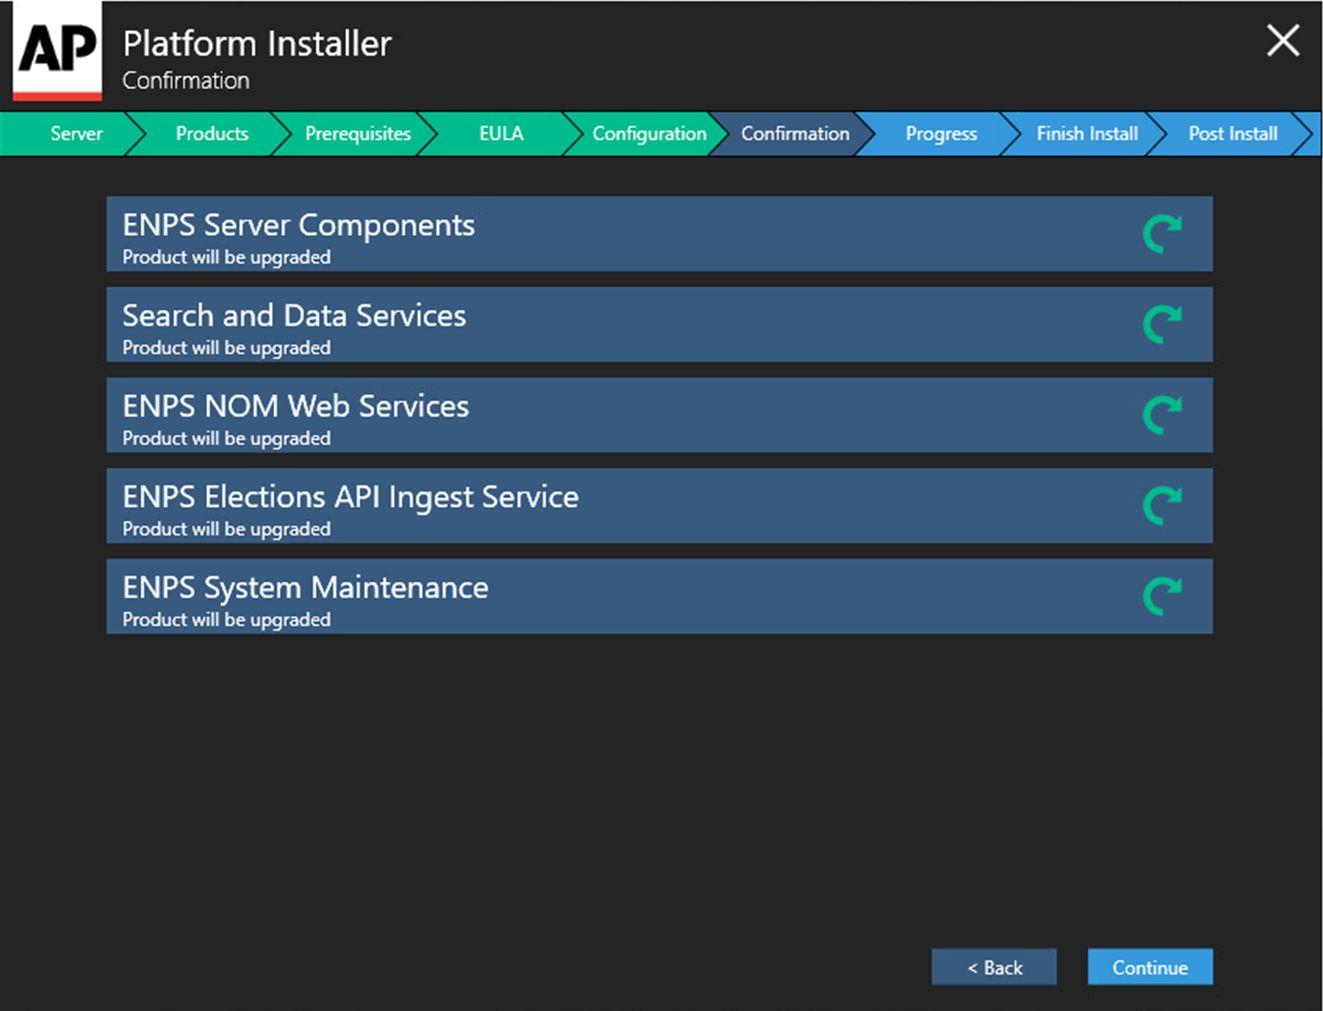
Click Continue to start installation.
-
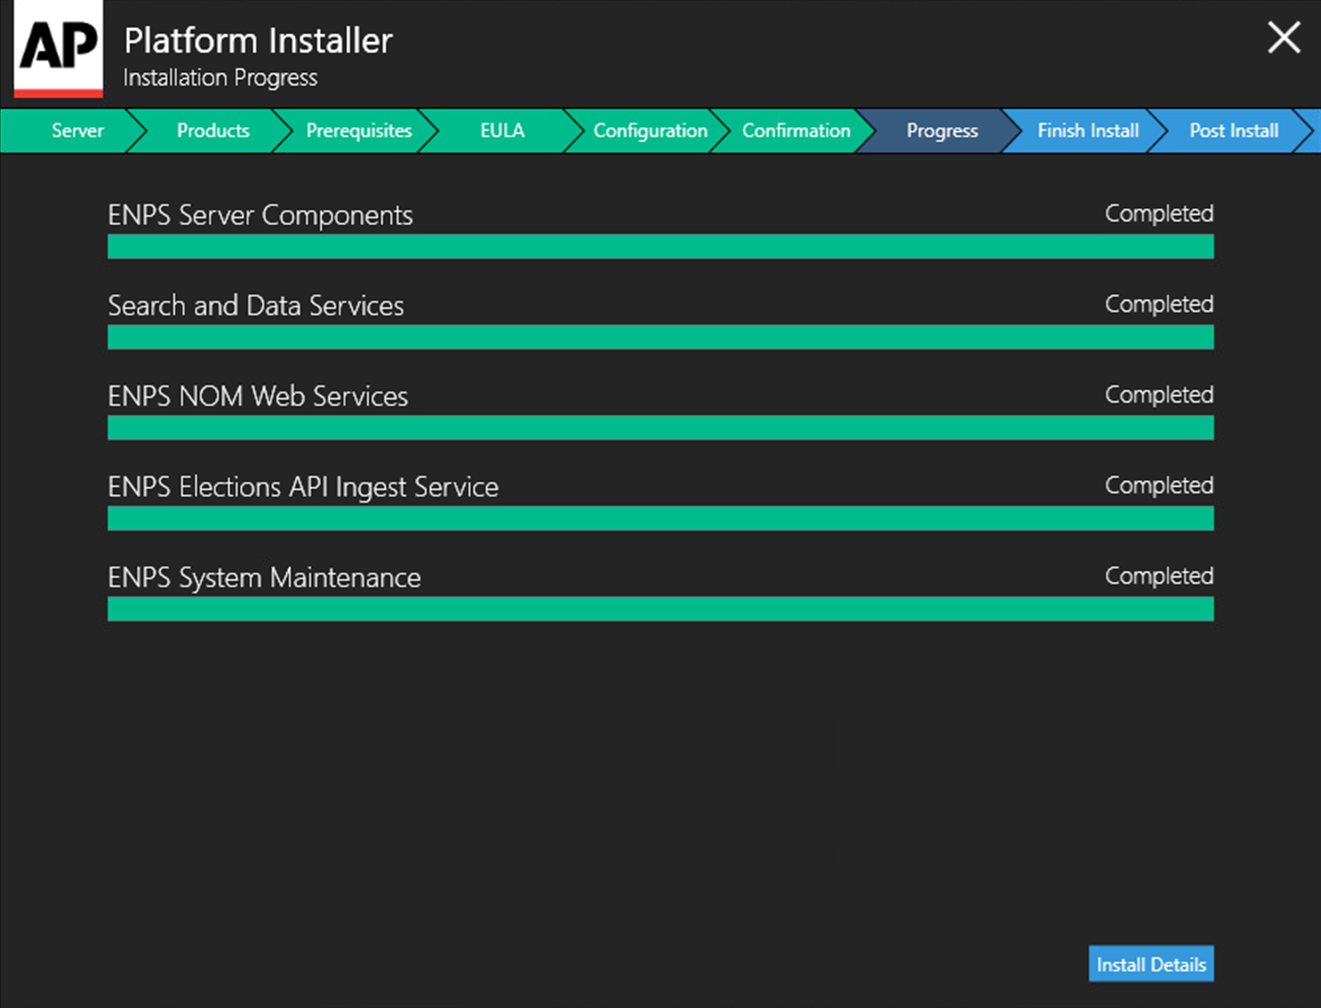
Wait for installation to complete.
-
Click Install Details.
-
Click Finish.
If prompted to restart the server, select No.
-
Click OK to close the installer.
Do not start NOM Watcher.
Proceed to the Post-installation instructions.
Post-installation
Before Server Restart
After Installation is complete and before restarting the server:
-
Open the ENPS\v7\ENPSClient.exe.config file.
-
Find the existing
<runtime>section. -
Immediately below the
<runtime>line, add the following line:<AppContextSwitchOverrides value="Switch.System.Windows.DisableXpsPackageBoundaryRestriction=true" />The beginning of the section should now look like this:
<runtime>
   <AppContextSwitchOverrides value="Switch.System.Windows.DisableXpsPackageBoundaryRestriction=true" />
   <assemblyBinding xmlns="urn:schemas-microsoft-com:asm.v1">
Adding this line works around a printing problem on machines that installed the 11 August 2026 Microsoft .NET Framework cumulative update.
Do not remove or change the existing
assemblyBindingcontent or other configuration settings.
-
-
Open the ENPS\v7\ENPSClient.exe.config file that is in the backups folder created during Primary Server Preparation.
-
Compare this backed up ENPS\v7\ENPSClient.exe.config file with the ENPS\v7\ENPSClient.exe.config file opened in step 1.
Specifically, check that the Primary and Secondary webservice settings are correct.
Continue with these steps:
-
If this server ingests FTP wires, confirm if the FTP wire log files (.DC) are in the NWP folder.
If not, restore them from the backup of the NWP folder created during Preparation.
-
Edit the NomWebServiceAppPool application pool:
-
Open Internet Information Services (IIS) Manager.
-
In the Connections pane, expand the server name and select Application Pools.
-
In the Application Pools pane on the right, right-click NomWebServiceAppPool and select Advanced Settings.
-
Set the Idle Time-out (minutes) option to 0 in the Advanced Settings popup.
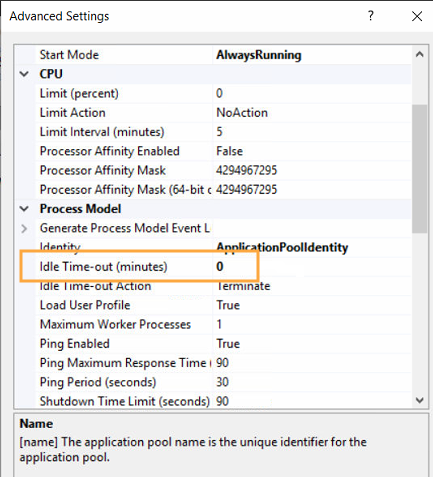
-
Click OK.
-
Right-click NomWebServiceAppPool again and ensure that it is started.
-
-
Delete the contents of the F:\NOM\MOS\OUT folder if it exists.
-
Remove the Watch.exe shortcut from the startup folders:
-
Click Start, type
Runand enter the following in the Run dialog to open the first startup folder: -
Remove the Watch.exe shortcut from the folder if it exists.
-
Click Start, type
Runand enter the following in the Run dialog to open the second startup folder: -
Remove the Watch.exe shortcut from the folder if it exists.
-
Now restart the server.
After Server Restart
After restarting the server:
-
Launch the News Object Manager (NOM) in block mode on the primary server by entering this into a command line:
There is a space after .exe and before /block.
If your ENPS data drive is something other than F:\, use that drive letter instead.
-
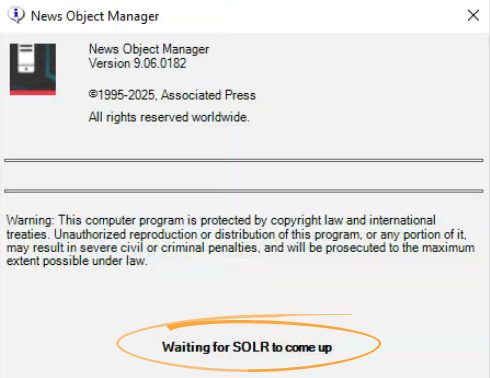
Wait for Solr to start if prompted.
After a restart it can take several minutes for Solr to become fully functional. The NOM may indicate as such.
You can proceed once this screen has disappeared and the NOM has fully launched.
-
Open Window > NOM Configuration/Status and ensure the Block Primary Access box is ticked.
-
Launch Watch.exe on the Buddy server.
-
Open the NOM Buddy Process window on the Buddy server and make sure it is emptying out to the Primary Server.
If not, try regenerating the schema on the Buddy Server by entering the following in a command prompt:
-
Click Start, type
Runand enter the following in the Run dialog to open the user startup folder:shell:startup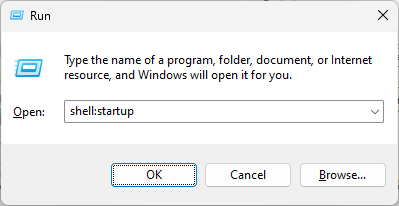
This should be for the account that is set to auto-logon to start ENPS server.
-
Copy the Watch shortcut from the desktop to the startup folder.
-
Confirm that all wires are ingesting as expected.
If any FTP wires are not ingesting, deactivate the wire, re-enter the password for the FTP server, and activate the wire again.
-
Ensure there is not a queue in the Buddy Maintenance Process window on the Buddy Server.
Set Up AP Media API
Set up your AP Media API wire natively on your server:
-
Open News Wire Profiler.
-
Select File > New Wire and select APMEDIAAPIFEEDS from the popup and click OK.
A new wire window appears.
-
Click More to expand the window to show settings for the new wire.
-
Configure the wire as follows:
Use the API key found in the earlier Find AP Media API Key section.
Field Description Get Member Content
Not used.
Server URL
Set to https://api.ap.org
API Key
API credentials provided by AP, for example on AP Newsroom.
Provider
Set to AP or other custom setting as needed.
Although multiple products can be added to each Media API wire, each wire may only have one Provider code. To use multiple Provider codes, create a separate Media API wire for each code.
Cat Map
Set to NAA or other custom setting as needed.
Story Format Select MediaAPI_v3.0_Story and MediaAPI_v3.0_Storybody respectively in the two dropdown menus.
-
Click Click to Refresh to update the Available Products list.
To add an available product to the Products to Display list, click on the product and then click ADD ->.
-
Tick the Active checkbox to activate the wire.
-
If you've previously been ingesting your AP Media API wires on a separate box then that box can now be powered down.
See Wires via AP Media API for more information on this wire.
Documentation Settings
Ensure that pressing F1 in the ENPS client and server applications opens the documentation for this version of ENPS.
-
Open System Maintenance.
-
Open the Global Configuration Options table.
-
Ensure the following options are set for ENPS 9.6:
Property
Required Value
OnlineHelpURL
http://docs.workflow.ap.org/docs/enps/9.6/user/
OperationsGuideURL
http://docs.workflow.ap.org/docs/enps/9.6/operations/
-
Click Save.
Set Up Search
Follow these steps to ensure that search works properly after upgrading from ENPS version 8:
-
Open F:\SearchServer\SearchCrawler.exe.config.
-
Ensure that the value for the
solrUrikey contains either your current server name or the localhost.<add key="solrUri" value="http://<CURRENTSERVERNAME>:8080/solr/enps" />For example, if using localhost then the line would look like this:
<add key="solrUri" value="http://localhost:8080/solr/enps" /> -
Open F:\SearchServer\SOLRSchemaManager.exe.config.
-
Ensure that the following line appears:
<add key="solrUrl" value="http://localhost:8080/solr/enps" />The Platform Installer should have automatically added that line.
-
Run the following from a Command Prompt to regenerate the SOLR Schema:
F:\SearchServer\SOLRSchemaManager.exe /regenerate /reset:trueThere are spaces after
.exeand afterregenerate. -
Copy the F:\SearchServer\SearchCrawler.exe.config file and paste it to the desktop of the server, creating a backup of the file.
You'll need this backup file later in these steps.
-
Speed up the process for crawls:
-
Open F:\SearchServer\SearchCrawler.exe.config.
-
Find the
<databases>section, which contains keys and values for NWS, your Primary server and your Buddy server.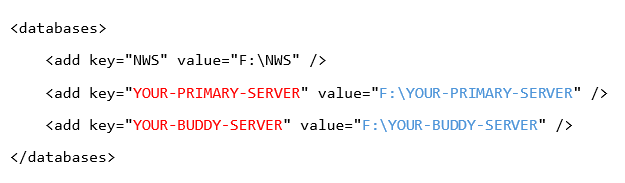
For example, if your Primary server is
WDCENPS-RG1and your Buddy server isWDCENPS-RG2, then you would currently see this: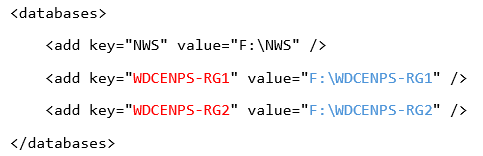
-
Edit the
<databases>section as follows:-
Remove the NWS entry.
-
Change the Primary server value to point at your main news folder.

Continuing the example, if your Primary server is
WDCENPS-RG1, your Buddy server isWDCENPS-RG2and your main news folder isP_RGNEWSthen your<databases>section would now look like this: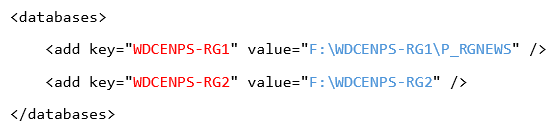
Keep in mind that your
<databases>section must have your server names and main news folder name instead of the example names above. -
-
Save the F:\SearchServer\SearchCrawler.exe.config file.
-
-
Run the following from a Command Prompt to repair any duplicate GUIDs and remove duplicate stories from WIP data:
F:\SearchServer\Searchcrawler.exe /repairguids /removeduplicatestoriesThere are spaces after
.exeand afterrepairguids.
-
Wait for the crawl to finish.
-
Repeat from Step 7 above if, in addition to your main news folder (
P_RGNEWSin the example above), your site has other groups to run the repair and remove duplicates crawl on.For example, look in your Primary Server name folder for different
P_groups. You may have a desk group (e.g.P_RGDESK) that you also want to repair and remove duplicates from. -
Replace the changed F:\SearchServer\SearchCrawler.exe.config file with the backup file you pasted to the desktop in an earlier step.
-
Recrawl the data:
-
Open a Command Prompt as an administrator.
-
Run the following command:
F:\SearchServer\Searchcrawler.exe

-
At this point it’s a choice - to come back to the Primary server and continue with the installation while the crawl runs, or let the crawl finish completely before continuing.
Unblock the Primary Server
-
If your users do not have local admin rights on their workstations, you may enter credentials they can use for the upgrade in the application, F:\NOM\Setadmin.exe. These credentials should have local admin rights on all workstations.
This will ensure that the ENPS Client can be upgraded on these workstations.
-
Unblock the Primary Server once the Buddy queue is empty.
-
Try launching a client to check if it upgrades.
If so, have one regular user close and relaunch ENPS.
If the upgrade fails, try a different account in setadmin.exe. It’s fine if it’s an account with an expiring password. You only need setadmin credentials to be current on a day you’re upgrading ENPS.
-
Launch a client on a machine without local admin rights to confirm that the client upgrades.
-
Upgrade all control room and set machines at this time (recommended).
NOM Maint Processes
There are three processes that may need fine-tuning to run certain tasks when it's the least busiest time for your users:
-
Delete Expired Items time in NOM Maintenance.
-
Folder Info time in NOM Maintenance.
-
NOM Web Services Application Pool recycle time in Internet Information Services (IIS) Manager.
By default, ENPS sets these to 2:00am local time. However, this time may not be the least busy time for your users and may cause disruptions. Think about your show schedule and when is least busy in your newsroom. You must ensure that the three processes are not running on your Primary Server at the exact same time they are running on your Buddy Server:
|
Field |
Primary Server |
Buddy Server |
|---|---|---|
|
NOM Maintenance > Delete expired items each day at |
non-busy time |
some time later |
|
NOM Maintenance > Scan folders each day at |
non-busy time |
some time later |
|
IIS > Recycling Settings > Specific time(s) |
non-busy time |
some time later |
In the example below we'll use the following times, with no overlap between the Primary Server times and the Buddy Server times:
|
Field |
Primary Server |
Buddy Server |
|---|---|---|
|
NOM Maintenance > Delete expired items each day at |
00:30:00 |
03:00:00 |
|
NOM Maintenance > Scan folders each day at |
02:00:00 |
04:30:00 |
|
IIS > Recycling Settings > Specific time(s) |
12:05 AM |
2:50 AM |
If you adjust the NOM Maintenance times you may also need to adjust the create times of any rundowns that are autocreated.
Rundowns should not be set to autocreate within the same hour as the Delete expired items each day at field on the Primary Server. For example, if Delete expired items each day at is set to 00:30:00 (12:30am) on the Primary Server, then no rundowns should be set to autocreate from 12:30am to 1:30am.
Step 1 - Set Times on the Primary Server
-
Open NOM Maintenance on the Primary Server.
-
Open Window > Delete Expired Items.
-
Set the value of the Delete expired items each day at field.
In our example, we set it to
00:30:00(which is 12:30am).Delete expired items each day at must be a 24-hour clock value in the range
00:00:00to23:59:59. -
Open Window > Folder Info.
-
Set the Scan folders each day at field.
In our example, we set it to
02:00:00(which is 2:00am).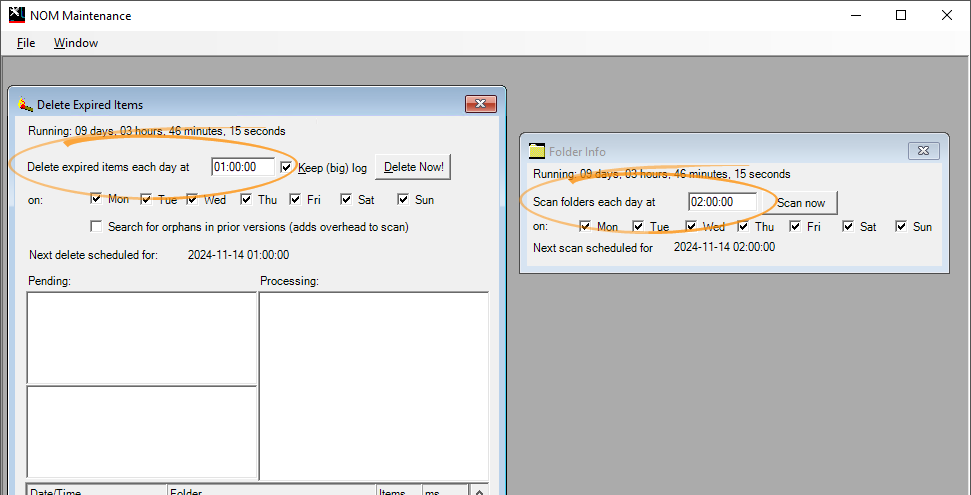
-
Open Internet Information Services (IIS) Manager on the Primary Server.
-
Expand the server name in the Connections pane and click Application Pools.
-
Right-click
NOMWebServiceAppPooland select Advanced settings from the popup menu. -
Set the value of the Specific time(s) field.
In our example, we set it to
12:05 AM.If your server is on a 24 hour locale then this number will be automatically converted to a
hh:mmformat. In this example,12:05 AMwill be converted to00:05.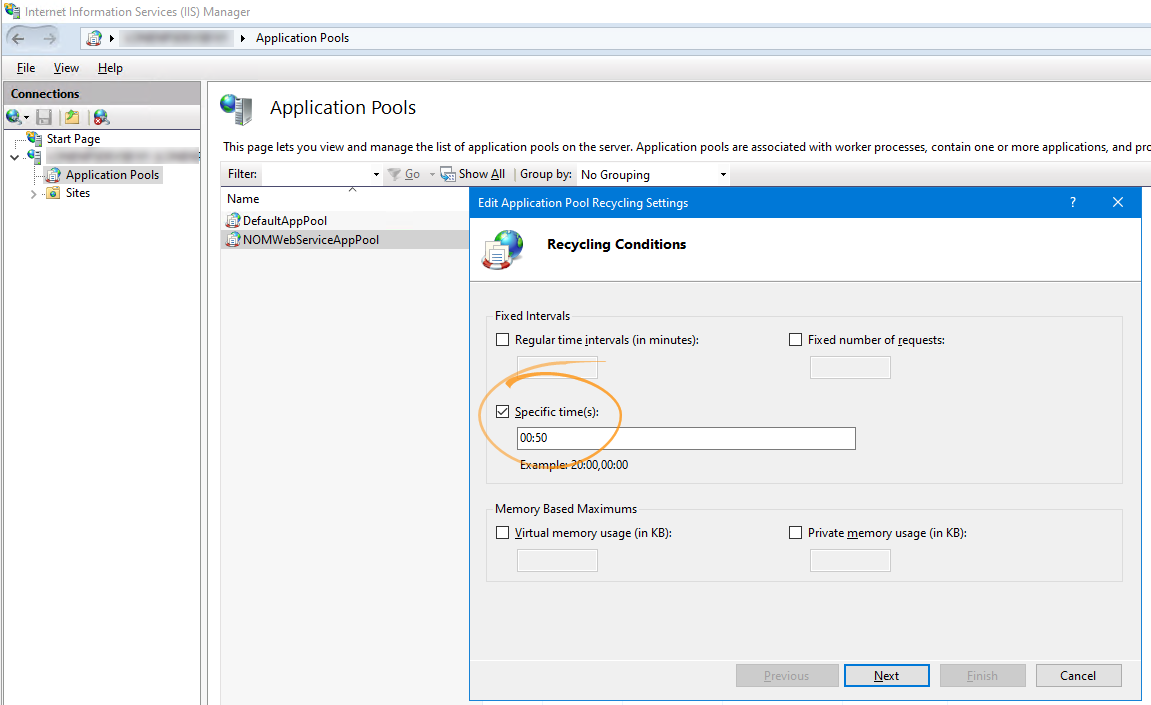
Step 2 - Set Times on the Buddy Server
Now set the same fields on the Buddy Server, but later than those set on the Primary Server so there's no overlap.
|
Field |
Primary Server |
Buddy Server |
|---|---|---|
|
NOM Maintenance > Delete expired items each day at |
00:30:00 |
later |
|
NOM Maintenance > Scan folders each day at |
02:00:00 |
later |
|
IIS > Recycling Settings > Specific time(s) |
12:05 AM |
later |
-
Open NOM Maintenance on the Buddy Server.
-
Open Window > Delete Expired Items.
-
Set the Delete expired items each day at field to a time that's different to what is set on the Primary Server.
In our example, we set it
03:00:00.Delete expired items each day at must be a 24-hour clock value in the range 00:00:00 to 23:59:59.
-
Open Window > Folder Info.
-
Set the Scan folders each day at field to a time that's different to what is set on the Primary Server.
In our example, we set it to
04:30:00.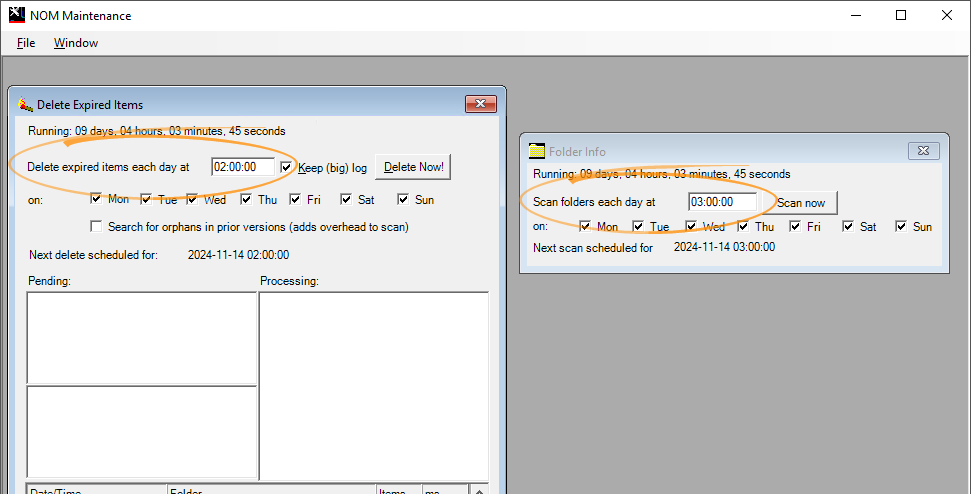
-
Open Internet Information Services (IIS) Manager on the Buddy Server.
-
Expand the server name in the Connections pane and click Application Pools.
-
Right-click
NOMWebServiceAppPooland select Advanced settings from the popup menu. -
Set the Specific time(s) field to a time that's different to what is set on the Primary Server.
In our example, we set it to
2:50 AM.If your server is on a 24 hour locale then this number will be automatically converted to a
hh:mmformat. In this example,2:50 AMwill be converted to02:50.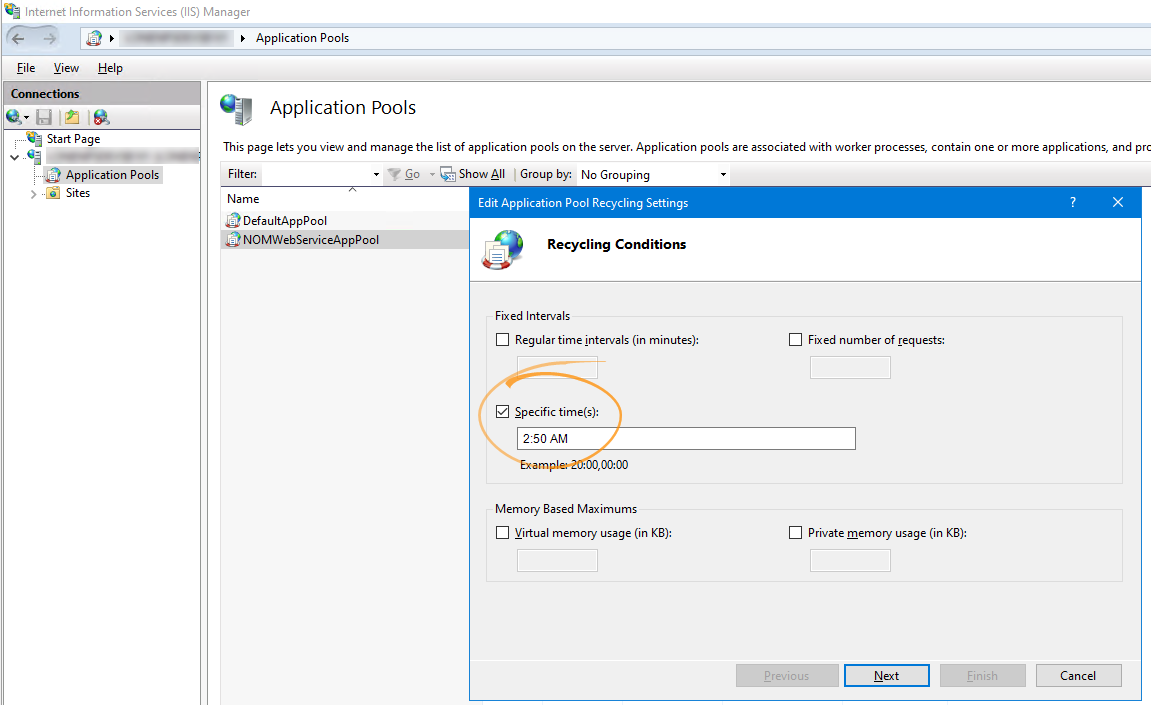
The fields are now set to the example times:
|
Field |
Primary Server |
Buddy Server |
|---|---|---|
|
NOM Maintenance > Delete expired items each day at |
00:30:00 |
03:00:00 |
|
NOM Maintenance > Scan folders each day at |
02:00:00 |
04:30:00 |
|
IIS > Recycling Settings > Specific time(s) |
12:05 AM |
2:50 AM |
Even though the Buddy Server times 3:00am and 4:30am are likely slightly busier time in the newsroom, this will not be an issue. The important factor is ensuring that the Buddy Server times are different from your Primary Server times, with no overlap.
If you wanted to further space out the times that the three processes run on the Primary Server compared to the Buddy Server, you could have them run in the afternoon on the Buddy Server. For example, you could set Delete expired items each day at to 13:30:00 (which is 1:30pm), and Scan folders each day at to 15:00:00 (which is 3:00pm):
|
Field |
Primary Server |
Buddy Server |
|---|---|---|
|
NOM Maintenance > Delete expired items each day at |
00:30:00 |
13:30:00 |
|
NOM Maintenance > Scan folders each day at |
02:00:00 |
15:00:00 |
|
IIS > Recycling Settings > Specific time(s) |
12:05 AM |
2:50 AM |
Next Steps
You have now upgraded the Primary Server!
Proceed to Upgrade Mobile Server if applicable.
